

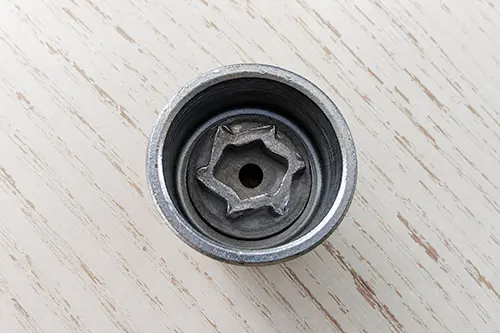
You’re on the side of the road with a flat tire, or maybe you’re in your garage getting ready to swap on new brake rotors. You grab your wheel lock key, slot it onto the locking lug nut, and apply steady force — but instead of turning, the key slips. You look closer, and your heart kind of drops: the internal splines of the wheel lock key are almost stripped. The pattern is rounded, the edges are gone, and every new attempt just makes it worse. So, what now?
This scenario is every DIY mechanic’s nightmare. A wheel lock is supposed to protect your expensive alloy wheels from thieves — not turn into a permanent, immovable obstacle. The good news is that even when the key is on its last legs, you still have several safe, effective removal options. In this guide, I’ll walk you through each method, starting with the simplest steps and moving into more aggressive extraction techniques, so you can get that locking lug nut off without damaging your wheel or stud.
Why Wheel Lock Keys Strip — And Why You Should Stop Immediately
Wheel lock keys are typically made from softer metal than the lug nut itself. That’s intentional — the key is designed to be the sacrificial component. Over time, repeated impacts from impact wrenches, especially at tire shops, slight misalignments, or simple wear can round off the internal pattern. The moment you feel that “spongy” or “slipping” sensation, stop. Right there.
Continuing to hammer away with a breaker bar or impact gun will only grind the key down further, leaving you with almost no purchase at all. Worse, you might round the mating surface inside the lock itself, and then every removal method after that gets harder. What is important here is recognizing the warning early, before you turn a bad situation into a really bad one.
Common causes of stripped keys include:
- Over-torquing: Many tire shops use impact wrenches set too high. Lug nuts (including locks) should be torqued to 80–100 ft-lbs typically, but impacts can exceed 300 ft-lbs.
- Cross-threading or rust: Corrosion seizes the lock to the stud, and when you apply force, the key strips before the nut breaks free.
- Worn key pattern: After dozens of uses, the internal splines simply wear out.
- Using the wrong key: A slightly loose-fitting universal key or generic replacement can accelerate stripping.
First rule: The moment you suspect the key is slipping, stop all attempts with that key. Take a breath, maybe two, and move to the methods below.
Before You Begin: What You’ll Need
Depending on how severe the stripping is, different tools may come into play. Here’s a checklist of what you might end up using:
- Hammer (2–3 lb mini-sledge or ball-peen)
- 12-point socket (usually a half-size or slightly smaller metric/standard)
- Breaker bar and/or long ratchet
- Penetrating oil (WD-40, PB Blaster, or Liquid Wrench)
- Angle grinder (last resort)
- Extractor socket set (spiral-fluted or splined removal sockets)
- Air hammer with chisel bit
- Welding equipment (if you have access)
- Torch (propane or MAPP gas)
- Safety glasses and gloves
Method 1: Hammer-on a 12-point Socket (The “Sacrificial Socket” Trick)
This is the most common, and often the first successful, method for a partially stripped wheel lock key. The idea is simple: force a tight-fitting 12-point socket over the outside of the rounded lock nut, bypassing the damaged key pattern entirely.
Step-by-step:
- Choose the right socket. You want a 12-point socket (not 6-point) that is slightly smaller than the outer diameter of the wheel lock. Metric and standard sizes are both possible — for many locks, a 19mm or 3/4" 12-point socket works, but you may need to go down a half-size (e.g., 18mm or 11/16").
- Spray penetrating oil around the base of the lock and let it sit for 10–15 minutes.
- Hammer the socket onto the lock. Place the socket over the lock and strike it firmly with a hammer. You want the socket to bite into the soft metal of the lock. It may take several hard blows. The socket will become permanently damaged — that’s fine, it’s basically a disposable tool at this point.
- Attach a breaker bar and apply slow, steady force. If it slips, hammer the socket on further. Often the lock will break free with a loud crack. Turn counterclockwise only.
- If the socket spins, try a different size or use a universal extractor socket (see Method 3).
This method works for about 70% of stripped wheel locks. The key, oddly enough, is commitment — don’t tap lightly; you need to deform the lock slightly so the socket grabs.
Method 2: Use a Dedicated Wheel Lock Removal Socket (Twist or Spline Extractors)
Several tool manufacturers make specialized removal sockets designed specifically for this situation. They use reverse spiral flutes or internal splines that bite deeper as you turn counterclockwise. Popular options include:
- Grip-Rite or Irwin Bolt Grip extractors
- Powerbuilt Lug Nut Remover set
- ATD Tools 6-piece impact-grade removal set
How to use: Select the size that just barely fits over the rounded lock. Tap it on with a hammer, then use a breaker bar. The internal flutes will dig into the metal. These work especially well when the lock head is still reasonably intact but the key pattern is gone. Avoid using them with an impact gun unless the set is rated for impact — hand torque gives you better control, and honestly, better odds too.
Method 3: Chisel and Hammer (Manual Extraction)
If the lock is extremely tight and the socket methods fail, you can break it loose mechanically. This is labor-intensive. It is also very effective.
- Apply penetrating oil and let it soak.
- Use a sharp cold chisel and a 2–3 lb hammer.
- Position the chisel at the outer edge of the lock, angled in a counterclockwise direction.
- Strike hard to create a notch, then reposition the chisel at an angle that will turn the lock.
- With repeated blows, you can rotate the lock incrementally. Once it moves a quarter turn, it will loosen by hand.
Caution: This method can slip and damage the wheel face. Use protective tape or a thick rag around the area. Also, be careful not to hit the wheel stud directly.
Method 4: Air Hammer with a Chisel Bit (Pneumatic Extraction)
If you have access to an air compressor and an air hammer, also called an air chisel, this is much faster than manual chiseling. Use a blunt chisel bit, set the air hammer to medium power, and place the tip against the outer edge of the lock at a 45-degree angle, pointing counterclockwise. The vibration and impacts will walk the lock around. This method works best on softer metal locks. Be extremely careful not to gouge the wheel — if you’re inexperienced, practice on a scrap piece first. It’s worth it.
Method 5: Weld a Nut onto the Lock (Ultimate Grip)
For professional mechanics, or anyone with welding gear and the skill to use it, this is the gold standard. You weld a standard hex nut directly onto the face of the rounded wheel lock. The heat from welding also helps break any corrosion bond. Once the nut is solidly welded, usually with a MIG welder, you simply use a regular socket and breaker bar to remove the lock. This method almost never fails, though it does require skill and can damage the wheel stud if you weld too deep.
Note: Most wheel locks are case-hardened, but the heat from welding anneals them, making removal easier. If you don’t have a welder, it is worth noting that some mobile mechanics or tire shops can do this for a small fee.
Method 6: Drilling Out the Lock Nut (Last Resort)
Drilling should be your final option because it takes time and carries a real risk of damaging the stud. You’ll need a high-quality drill bit (cobalt or carbide), a center punch, and patience. A lot of patience.
- Punch a center mark exactly in the middle of the lock face.
- Start with a small pilot bit (1/8″) and drill straight in.
- Gradually increase bit sizes. The goal is to drill out the center until the lock splits or weakens enough to be knocked off.
- Once the lock is removed, you may need to clean up the threads with a thread chaser or replace the stud.
This method can take 20–40 minutes per lock. Use cutting oil to keep bits cool. If you drill off-center, you’ll ruin the stud — so go slow and stay precise.
Method 7: Professional Mobile Service (When You’re Out of Options)
Sometimes the smart move is calling a professional. Mobile mechanics and roadside assistance providers often have specialized tools like the “Lug Nut Master” set or hydraulic removal tools. For around $50–$100 per wheel, they can remove stripped locks in minutes without damaging your wheels. This is especially worthwhile if you have expensive aftermarket wheels or if the lock is recessed in a tight wheel design.
Comparison Table: Wheel Lock Removal Methods at a Glance
| Method | Difficulty | Tools Required | Risk of Wheel Damage | Success Rate (Moderate Stripping) |
|---|---|---|---|---|
| Hammer-on 12-pt socket | Easy | Hammer, socket, breaker bar | Low | 70% |
| Extractor socket set | Easy | Specialty socket, hammer, bar | Low | 80% |
| Chisel & hammer | Moderate | Chisel, heavy hammer | Medium | 60% |
| Air hammer | Moderate | Air compressor, air chisel | Medium | 75% |
| Welding a nut | Hard | MIG/TIG welder, nut, socket | Low (if skilled) | 95% |
| Drilling out | Hard | Drill, cobalt bits, oil | High | 50% (varies) |
Prevention: How to Avoid Stripping Your Wheel Lock Key in the Future
Once you’ve removed the offending lock, replace it immediately. Then make sure you don’t end up right back here.
- Never use an impact gun on wheel locks. Always install and remove locks by hand using a breaker bar and torque wrench. Final torque should be with a torque wrench only.
- Keep the key clean. Dirt and rust inside the key pattern cause poor engagement. Clean it with a wire brush and spray lubricant before each use.
- Replace worn keys. If you notice any rounding, buy a replacement key from the manufacturer (most have codes).
- Consider switching to spline drive or rotating collar locks. These designs are less prone to stripping than traditional “tuner” or “Gorilla” style locks.
- Buy a spare key. Keep one in your glove box and one at home. Cheap insurance, really.
- Anti-seize compound. Apply a tiny amount to the threads (not the cone seat) to prevent seizing. But reduce torque by 10–15% when using anti-seize.
What NOT to Do: Common Mistakes That Make Things Worse
- Using a torch without protecting the wheel. Acetylene torches can melt aluminum wheels instantly. If you must use heat, use a heat gun or carefully shield the wheel with a wet rag and use a small butane torch only on the lock itself.
- Hammering the key back on. If your key is already stripped, hammering it onto the lock won’t give you better grip — it will just destroy whatever pattern is left.
- Overtightening a damaged extractor. If the extractor slips, stop and try a different method. Spinning a hardened extractor inside the lock will only smooth the surface even more.
- Ignoring the problem. Driving with a wheel lock that’s partially loose or damaged can lead to wheel separation. Deal with it immediately.
Final Thoughts: Stay Calm, Work Methodically
A stripped wheel lock key feels like a disaster, especially if you’re stuck on the roadside. But with the techniques above, you have a clear path forward. Start with the simplest, least destructive method, usually the hammer-on socket or extractor, and work your way up from there. In the vast majority of cases, you’ll have the lock off within 20 minutes without damaging the wheel.
Remember: precision and patience win here. Rushing with an impact gun or a too-large hammer will only make the problem more expensive. And once that lock is off, treat yourself to a fresh set of locks — or go back to standard lug nuts if wheel security isn’t a major concern in your area. Your wheels, and your future self, will thank you.
Safe driving, and may your lug nuts always turn smoothly.