

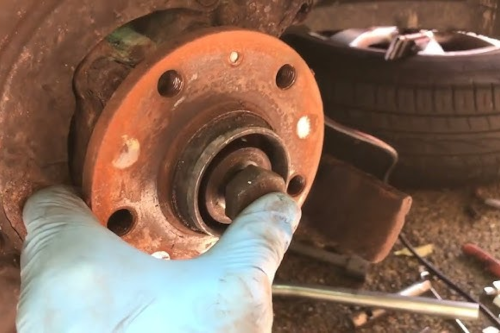
A low‑frequency hum that tracks with road speed but ignores engine RPM usually points to a wheel hub bearing. With a simple load test you can call the side confidently, then replace the hub without seized‑bolt drama.
How the noise behaves
- Grows with speed; often changes pitch slightly on long, gentle turns.
- Unaffected by gear/engine RPM at steady speed—rules out drivetrain.
- Some hubs integrate ABS sensors; intermittent ABS lights can accompany the hum.
Load diagnosis—pick the side without guessing
- Turn slightly left: the right side is loaded—bad right gets louder.
- Turn slightly right: the left side is loaded—bad left gets louder.
- Confirm with a chassis ear or by checking hub temperature after a highway run (hotter side often failing).
Don’t confuse tire noise
- Cupped tires can mimic bearing hum. Swap front/rear or cross‑rotate and re‑road‑test.
- Fresh asphalt vs concrete expansion joints: note how noise changes with surface.
Replacement quick guide (bolt‑on hub)
- Break axle nut torque on the ground. Raise and support the vehicle safely.
- Remove caliper and rotor; unplug the ABS harness from the hub and body clips.
- Soak the hub bolts/flange; use penetrant and heat if you’re in the rust belt.
- Unbolt the hub from the knuckle; drive it out evenly to avoid knuckle damage.
- Clean the mating face until shiny; any rust high‑spot will make the new hub sit crooked.
- Install the new hub; torque hub bolts and the axle nut to spec (no impact “zip‑gun” on the nut—use a torque wrench).
After the job
- Road‑test—noise gone? Perform an ABS stop; verify the sensor reads.
- Re‑torque wheel lugs after 50–100 km.
- Inspect the old hub: blueing, roughness, or play confirms the diagnosis.
Pro tips
- On heavily corroded assemblies, use a hub‑puller plate or slide hammer with care to protect the knuckle.
- Anti‑seize a thin film on the hub pilot for easier future service—keep it off friction faces.
- If alignment cams were disturbed, schedule an alignment check.
Result: with a load test and clean mounting surfaces, bearing calls are confident and replacements are one‑and‑done.
Hub styles and torque philosophy
- Bolt‑on hubs: simple swap; corrosion is the main enemy.
- Press‑in bearings: require a press and correct adapters to avoid damaging the new bearing.
- Axle nut preload: follow spec precisely—too loose or too tight kills a new bearing quickly.
Case study: misdiagnosed tire noise
Customer reported a “bearing howl” after new winter tires. Load test was inconclusive; noise changed dramatically with a tire rotation. Final: cupped rear tires, not a hub. Lesson—rule out tires before ordering parts.
Noise decision tree
- Speed‑dependent hum? Continue. If RPM‑dependent, look at drivetrain.
- Surface‑dependent change (asphalt vs concrete)? Consider tires first.
- Louder in left vs right sweepers? The opposite side bearing is suspect.
- ABS codes or erratic speed reading? Integrated sensor may be failing with the bearing.
Tool list that saves knuckles
- Hub puller plate or slide hammer, penetrant, MAP gas for the rust belt
- Torque wrench for hub bolts and axle nut; new axle nut where specified
- Wire brush/disc for the knuckle face; anti‑seize (thin film) on the pilot
Practical section
- Do I need an alignment? Not for a bolt‑on hub, unless control arm eccentrics were loosened.
- Both sides at once? Only if mileage/noise suggests it; otherwise fix the confirmed side first.