

You're cruising down the highway, everything feels smooth — then you touch the brake pedal. The steering wheel begins to shake back and forth, sometimes violently, but as soon as you release the brakes, the vibration disappears. If this sounds familiar, you're dealing with one of the most common yet misunderstood brake issues. Many drivers immediately blame "warped rotors," but the truth is more nuanced. Modern braking systems rarely experience true metallurgical warping. Instead, the culprit is almost always rotor thickness variation, improper wheel seating, or a corroded hub mounting face — or a combination of these three. Understanding the difference can save you hundreds of dollars in unnecessary repairs and keep your braking system safe and predictable.
Why Does the Steering Wheel Shake Only During Braking?
The sensation of shaking or pulsation through the steering wheel is almost always feedback from the front brakes. When you apply the brakes, the calipers squeeze the rotors. If the rotor's surface is not perfectly parallel (thickness varies), the brake pads will ride the high spots, causing the caliper piston to move in and out. That movement transmits hydraulic pressure pulses back through the brake lines, then through the steering linkage, and finally into the steering wheel. Similarly, if a wheel is not perfectly seated against the hub, or if the hub face has rust or debris, the rotor will not run true, mimicking thickness variation. Let's break down each potential cause in detail.
1. Rotor Thickness Variation (The Real "Warped Rotor")
For years, mechanics and drivers have used the term "warped rotors" to describe brake judder. However, true metallurgical warping (a bend in the rotor) is extremely rare on modern vehicles. The actual condition is called Disc Thickness Variation (DTV). DTV occurs when the rotor's thickness changes around its circumference. This is usually measured in thousandths of an inch — as little as 0.001″ of variation can cause a noticeable shake. How does DTV develop?
- Lateral Runout from improper installation: If a rotor is installed without cleaning the hub face (see cause #3), it will wobble slightly. Over thousands of miles, the brake pads wear the high spots more aggressively, creating a wavy, uneven surface.
- Deposited brake pad material: After repeated heavy braking (e.g., towing down a mountain pass), the pads can transfer an uneven layer of friction material onto the rotor. This creates a "sticky" spot that feels like a thickness variation.
- Corrosion: In humid or winter climates, rotors can develop rust patches. If the vehicle sits unused for a period, rust forms unevenly. The first few braking events may feel rough, but if the rust is deep, it can permanently alter the rotor's surface.
Diagnosing DTV requires a dial indicator to measure runout or a micrometer to measure thickness at 8-12 points around the rotor. Most DIYers will simply feel the pulsation and choose to resurface or replace the rotors.
2. Improper Wheel Seating (The Overlooked Culprit)
This is a surprisingly common problem that mimics bad rotors perfectly. When a wheel is reinstalled — after a tire rotation, flat repair, or brake job — the wheel must be torqued evenly and in the correct sequence. If lug nuts are over-tightened unevenly, or if the wheel isn't fully seated against the hub, the wheel itself will wobble. When you brake, that wobble transmits directly through the rotor and into the steering wheel. Signs of improper wheel seating include:
- The shake appeared immediately after a wheel was removed and reinstalled.
- You notice a vibration slightly even when not braking (though it's most pronounced under braking).
- You recently used an impact gun to tighten lug nuts without a torque wrench.
How to fix: Loosen the lug nuts, lift the wheel off the ground, clean the mating surfaces (see below), then hand-start all nuts. Tighten in a star pattern using a torque wrench set to the manufacturer's specification (typically 80-100 lb-ft for passenger cars, 100-140 lb-ft for trucks). If the wheel was severely distorted, you may need to check for damage to the wheel bolt holes or the studs themselves.
3. Hub Rust Face (The Silent Brake Killer)
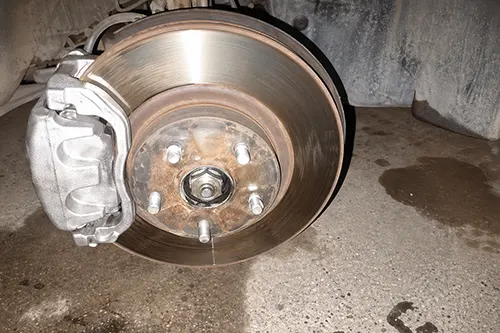
Perhaps the most insidious cause of brake judder is a rusty or contaminated hub mounting face. This is the flat circular surface on your vehicle's wheel hub where the brake rotor sits. In salt-belt states, this surface develops thick, flaky rust over time. When you install a new rotor over a rusty hub, the rotor does not sit perfectly flat. It wobbles by the thickness of the rust — even a few thousandths of an inch of rust causes enough lateral runout to create DTV within a few thousand miles of driving. Even worse, many DIYers (and some shops) skip the critical step of cleaning the hub face. The result: a brand‑new rotor that immediately runs out of true, causing the same steering wheel shake you were trying to fix.
How to inspect: Remove the rotor and look at the hub face. Any rust, dirt, or old gasket material will show as lumpy, crusty deposits. Run your finger across the surface — it should be smooth and flat to the touch. If you feel bumps, that's the problem.
The fix: Use a wire brush on a drill (or a hand wire brush) to aggressively clean the hub face. For stubborn rust, a fine-grit sanding disc or a hub cleaning tool (like a steel brush cup) works wonders. The goal is to achieve a bare metal surface with no raised areas. Reapply a thin film of anti-seize compound (avoiding the lug holes) to prevent future corrosion. Only then should you install the rotor and wheel.
Comparison Table: Rotor Variation vs. Wheel Seating vs. Hub Rust
| Characteristic | Rotor Thickness Variation | Improper Wheel Seating | Hub Rust Face |
|---|---|---|---|
| Primary symptom | Steering wheel shakes ONLY under braking, intensity increases with speed | Vibration under braking, but may also feel a slight shimmy at highway speeds without braking | Shake appears gradually after brake service or rotor replacement, often gets worse over time |
| Typical cause | Previous lateral runout, aggressive braking, pad material transfer | Uneven lug nut torque, cross‑threaded studs, debris between wheel and hub | Corrosion from road salt/moisture, old rotor gaskets, paint on new rotors |
| Inspection method | Measure DTV with micrometer or runout with dial indicator | Check lug nut torque; spin wheel and watch for side‑to‑side wobble | Remove rotor and visually inspect hub face for rust or debris |
| DIY fix | Machine rotors (if enough thickness) or replace with high‑quality rotors | Loosen, clean, correctly torque in star pattern | Wire brush, sanding disc, or hub cleaning tool to achieve bare metal |
| Prevention | Bed in new pads/rotors properly, avoid holding brakes after hard stops | Always use a torque wrench, never impact gun for final tightening | Clean hub every time you remove rotor; apply anti‑seize |
Step‑by‑Step Diagnosis: Which One Is Causing Your Shake?
Follow this logical process to isolate the root cause before spending any money on parts.
Step 1: Replicate the symptom safely.
Find an empty road and test brake feel at 30 mph, 50 mph, and 70 mph. Note if the shake is felt primarily in the steering wheel (front brakes) or through the seat (rear brakes). For a steering wheel shake, focus on the front axle.
Step 2: Check recent service history.
Did the shake start immediately after a tire rotation, brake job, or wheel removal? If yes, the problem is highly likely to be wheel seating or hub rust. If the vehicle hasn't been touched recently, DTV is more probable.
Step 3: Inspect lug nut torque.
Using a torque wrench, check all lug nuts on the front wheels. If any are significantly under‑ or over‑torqued, or if you notice uneven tightening, correct the torque and test drive. Often, this alone resolves the issue.
Step 4: Lift the front wheels and spin them.
With the wheels off the ground, spin each front wheel by hand. Listen for rubbing noises and look for side‑to‑side wobble. A visibly wobbling wheel indicates improper seating or a bent wheel. Also, use a dial indicator against the wheel rim itself; runout greater than 0.030″ is too much.
Step 5: Remove the wheel and inspect the hub face.
This is the most revealing test. Remove the wheel and take off the brake rotor. Examine the hub face. If you see any rust flakes, raised pitting, or remnants of an old paper gasket (some rotors come with a protective film), then that is your problem. Clean the hub thoroughly, reinstall the rotor, and test drive before considering rotor replacement.
Step 6: Measure rotor runout and thickness variation.
If cleaning the hub and correctly torquing the wheel don't fix the shake, you likely have genuine DTV. Use a dial indicator on the rotor friction surface. Replace or machine the rotors if runout exceeds specification (usually > 0.002-0.003″). Always pair rotor replacement with new brake pads for best results.
Why "Just Replace the Rotors" Is Not Always the Answer
Many auto parts stores and quick‑lube shops will immediately recommend new rotors and pads when you mention a shaking steering wheel. However, if the root cause is a rusty hub or improperly seated wheel, new rotors will develop the same shake within weeks or months. I've seen countless frustrated drivers replace rotors three times in a year, only to discover a crusty hub face was the real villain. Always, always clean the hub mounting surface before installing any new rotor. Period. This simple 5‑minute step with a wire brush can extend the life of your brakes and keep your steering wheel rock‑solid.
Preventive Maintenance to Keep Your Steering Wheel Steady
- Bed in your brakes: After installing new rotors and pads, perform a proper bed‑in procedure: 6‑8 moderate stops from 45 mph to 10 mph, followed by 2‑3 hard stops from 60 mph, then drive without braking to cool the rotors. This evenly transfers pad material onto the rotor.
- Torque wheels every time: Even if you paid a shop for a rotation, re‑torque the lug nuts after 50-100 miles. Many shops use impact guns that over‑torque or tighten unevenly.
- Inspect hub faces seasonally: Every spring, pull your wheels and inspect hub faces for rust buildup. A quick cleaning prevents long‑term DTV issues.
- Avoid "riding the brake" after heavy use: After descending a long grade or towing, try to let the brakes cool without holding the pedal at a stop. Keeping the pads pressed against hot rotors can create uneven pad deposits.
When to Call a Professional
While the three causes described above can be diagnosed and fixed by a competent DIY enthusiast, there are situations where professional help is warranted:
- You don't own a torque wrench or dial indicator, and you're not comfortable buying them.
- After cleaning the hub and torquing wheels correctly, the vibration persists — you may need on‑car rotor machining to correct hub runout.
- The vibration is accompanied by grinding noises, pulling to one side, or a spongy brake pedal — that could indicate caliper or hydraulic issues beyond simple rotor variation.
- Your vehicle has advanced electronic braking systems (e.g., brake‑by‑wire or integrated e‑brake calipers) that require special procedures.
Conclusion: Diagnose Before You Replace
A steering wheel that shakes only when braking is annoying, alarming, and potentially dangerous if it distracts you in an emergency stop. But it is almost always solvable without throwing expensive parts at the problem. Start with the simplest, most overlooked causes: lug nut torque and hub rust. Only then move on to rotor thickness variation. By following the diagnostic steps outlined above, you'll save money, time, and frustration — and you'll enjoy a smooth, confidence‑inspiring braking experience. Remember: your vehicle's brake system is only as good as the surfaces it clamps to. Keep those hubs clean, those wheels torqued, and those rotors true, and that annoying shake will become a distant memory.
Final pro tip: The next time someone tells you "your rotors are warped," ask them when they last cleaned their hub faces. You'll probably see a puzzled look — and you'll know exactly where the real problem lies.