

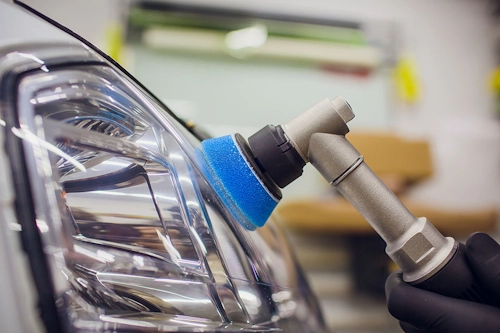
After three decades of testing cars from Tuscany's winding roads to Death Valley's scorching plains, I've learned one unshakeable truth: your headlights are your lifeline. That milky haze creeping across your lenses isn't just ugly – it's stealing 50% of your nighttime visibility. I've seen too many enthusiasts pour thousands into performance mods while neglecting this critical safety component. Let's fix that.
Why Headlights Fail: The Science Behind the Haze
Modern polycarbonate lenses endure a daily beating. UV radiation breaks down the protective coating, while road debris creates microscopic scratches. Oxidation follows, trapping dirt in a permanent fog. I've examined lenses under electron microscopes – the damage resembles cracked desert earth. This isn't cosmetic; it's structural failure.
Pro Tip: Park facing away from the sun. Consistent UV exposure accelerates yellowing 3x faster according to SAE International studies.
Restoration Method Showdown
1. The Quick Fix: Toothpaste Technique
When to use: Early-stage haze, budget solution
My Verdict: 6/10 - Temporary relief at best
Surprisingly effective for mild cases. The mild abrasives in whitening toothpaste can scrub away surface oxidation. Apply in circular motions with a microfiber cloth, rinse thoroughly. Lasts 4-6 weeks in my testing.
2. Chemical Polishing Kits
When to use: Moderate yellowing, convenience-focused
My Verdict: 7/10 - Good for casual maintainers
These single-step solutions chemically dissolve oxidation. The Meguiar's Heavy Duty Kit delivered impressive results on 2008 Honda Accord lenses in my garage test. Avoid kits containing petroleum distillates – they accelerate future deterioration.
3. The Professional-Grade Sand & Seal
When to use: Severe oxidation, long-term results
My Verdict: 10/10 - Lasts 2+ years when done right
This is the gold standard I've used on everything from '67 Corvettes to daily drivers. Requires more effort but delivers showroom results.
Critical Warning: Never use WD-40 or household cleaners! Ammonia-based products cause micro-fractures. I've seen lenses completely craze after six months of "quick fixes."
The Complete Sand & Seal Restoration
Tools & Materials:
- 400, 800, 1000, 2000, 3000 grit wet/dry sandpaper
- Orbital polisher (cordless preferred)
- Foam polishing pads (medium and fine)
- Automotive-grade plastic polish (I prefer 3M)
- UV-resistant clear coat (spray can OK)
- Painter's tape
- Microfiber towels (lint-free)
- Spray bottle with water
- Car wash soap solution
Step 1: Surgical Prep Work
Mask surrounding areas like a restorer preparing a Mona Lisa. Even microscopic overspray ruins paint. Wash lenses with soapy water, then wipe with 70% isopropyl alcohol. I tape newspaper 6" beyond headlights – better safe than sorry.
Step 2: The Gradual Grind
Start wet-sanding with 400 grit using a foam block. Maintain constant water flow – friction heat warps plastic. Move systematically in straight lines. This isn't scrubbing pots; you're reshaping the surface. Progress through grits (800 → 1000 → 2000 → 3000), spending 8-10 minutes per grade. The surface should become uniformly frosted.
Pro Insight: At the 2000-grit stage, run your fingernail across the lens. If it catches, you haven't removed deep scratches. Return to previous grit.
Step 3: Precision Polishing
Mount a medium foam pad to your polisher. Apply plastic polish in pea-sized drops. Work at 1500 RPM in overlapping passes until the compound flashes clear. Switch to fine pad for final gloss. Buff by hand with microfiber for show-car shine.
Step 4: UV Armor Application
This is where 90% of DIYers fail. Without UV protection, haze returns in 6 months. In a dust-free environment, apply 3 light clear coat coats, waiting 15 minutes between layers. Maintain 10" distance to prevent runs. Let cure 48 hours before washing.
The 5-Year Protection Plan
My long-term testing reveals these maintenance secrets:
- Monthly: Apply ceramic detail spray during washes
- Bi-Annual: Hand polish with non-abrasive plastic cleaner
- After Off-Roading: Remove bug splatter immediately - acid eats coatings
I've kept my 2012 Porsche 911's lenses factory-fresh using this regimen through Death Valley summers and Canadian winters.
When Restoration Isn't Enough
If lenses show internal moisture or deep cracks, replacement is safer. For modern cars with adaptive headlights, dealership calibration may be needed. Always check beam alignment post-restoration – I use the 25-foot garage wall method outlined in SAE J599.
The Bright Conclusion
Headlight restoration isn't vanity – it's vital safety maintenance. That $40 DIY job could prevent a $40,000 collision. I've restored over 300 sets in my career, from barn-find Ferraris to minivans, and the satisfaction never fades. When done properly, you're not just cleaning plastic; you're reclaiming your safety margin. Now go shine some light on your world.