

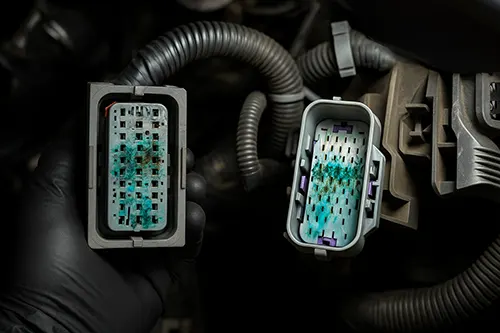
What heat damage looks
Heat-damaged connectors rarely announce themselves with a single clear symptom. Instead you see intermittent failures: lights that flicker, a fan that cuts out, charging that acts odd, or a component that works until it warms up. The physical clues are often right there—browned plastic, brittle insulation, or a connector that feels loose even when latched.
Load test, not guess
A connector can look “fine” and still fail under load. The practical approach is to test while the circuit is working hard. That’s when resistance turns into heat and voltage drop.
Voltage-drop measurement steps
- Turn the load on (headlights, blower, fan—whatever is relevant).
- Measure voltage at the source and at the component side.
- A noticeable drop across a connector indicates resistance at the terminals.
- If the reading changes when you gently wiggle the harness, you found a movement-sensitive problem.
This test is more useful than swapping parts, because it tells you where energy is being lost as heat.
Pin fit and tension
Loose terminal tension is a common root cause. If a terminal slides on/off too easily, it will arc and heat under load. A properly fitting terminal should feel firm, not sloppy.
Repair: pigtail replacement
If the connector body is melted or the terminals are discolored, replacing the connector/pigtail is usually the durable fix. Cut back to clean copper, then splice using a method you trust. The goal is low resistance and strain relief.
Crimp vs solder choice
Good crimps with the correct tool are reliable and common in OEM harness work. Solder can work too, but poor soldering creates a stiff point that cracks over time. Choose one method and do it correctly; don’t mix “half crimp, half solder” out of uncertainty.
Weather sealing and strain
Use heat-shrink and proper sealing where the connector lives in splash or engine heat. Also add strain relief: if the harness is pulled tight, vibration will attack your splice.
Heat sources to inspect
After repairing one heat-damaged connector, inspect neighbors. If one connector cooked because it sits near heat or high current, nearby connectors may be aging too. This is where you prevent the next failure, not just fix the current one.
Post-repair load recheck
Repeat the same voltage-drop test after the repair. The number should improve and stay stable under wiggle. That stability is your proof.
Preventing a repeat
The best prevention is reducing resistance and heat: correct terminals, clean copper, proper sealing, and secure routing away from sharp edges and hot housings.
Voltage-drop rule of thumb: measure under load, not with the circuit off. A connector can look perfect at rest and still drop voltage (and heat up) once current flows.
After a pigtail repair, gently tug-test each wire and add strain relief. Many repeat failures are not electrical—they’re mechanical fatigue at the splice point.
Voltage-drop numbers that matter
In many 12 V circuits, even a small drop across a connector under load is a warning sign. The absolute ‘bad’ number depends on the circuit, but the trend matters: if wiggling the harness changes the drop, you’ve found a weak contact. Fixing that contact often fixes the symptom without replacing the component.
Terminal repair quality checks
After crimping or splicing, check three things: mechanical strength (tug test), electrical stability (load test), and sealing (no exposed copper). A good electrical repair is also a good mechanical repair—vibration will test your work.
Heat damage prevention
Prevention is mostly routing and contact quality. Keep high-current connectors away from exhaust heat where possible, secure the harness so it can’t rub, and don’t ignore minor looseness—small looseness becomes arcing, arcing becomes heat, and heat becomes the failure you’re chasing.