

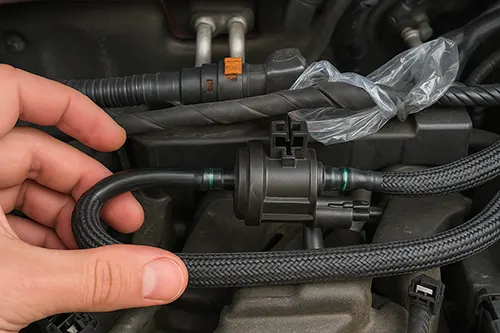
Understanding the EVAP Purge Valve and Its Role
The Evaporative Emission Control (EVAP) system is one of the most misunderstood yet critical components in modern vehicles. Designed to prevent fuel vapors from escaping into the atmosphere, the EVAP system captures these vapors in a charcoal canister and later routes them to the engine for combustion. At the heart of this process lies the purge valve (also known as the purge solenoid or canister purge valve).
The purge valve is an electronically controlled solenoid that opens and closes to allow fuel vapors stored in the charcoal canister to be drawn into the intake manifold. When the engine is running and specific conditions are met (engine warm, certain RPM, closed-loop operation), the Powertrain Control Module (PCM) sends a signal to open the valve, creating vacuum that pulls vapors into the engine. A faulty purge valve can trigger the dreaded Check Engine Light, cause rough idle, hard starting, poor fuel economy, and even failed emissions tests.
Symptoms of a Failing EVAP Purge Valve
Before diving into diagnostics, it's essential to recognize the telltale signs of purge valve trouble. These symptoms often overlap with other EVAP system issues, so methodical testing is key.
- Check Engine Light (CEL) illuminated – Common trouble codes include P0443 (Purge Valve Circuit Malfunction), P0446 (EVAP Vent Control Circuit), P0455 (Large Leak), or P0496 (High Purge Flow).
- Rough idle or stalling – A stuck-open purge valve allows a constant vacuum leak, leaning out the air-fuel mixture and causing unstable idle.
- Hard starting – If the valve sticks open, fuel vapors can flood the intake, making hot starts difficult.
- Poor fuel economy – An improperly functioning purge valve can disrupt the fuel trim, leading to excessive fuel consumption.
- Fuel smell – A valve stuck closed may cause pressure buildup and vapor leaks elsewhere; stuck open may allow raw vapors into the engine when not commanded.
- Failed emissions test – The EVAP system is directly monitored during OBDII testing; a faulty purge valve often causes a "not ready" status or failure.
Essential Tools for Quick Checks
You don't need a full diagnostic lab to test a purge valve. These basic tools will cover most quick checks:
- Digital Multimeter (DMM) – For checking electrical resistance and verifying control signals.
- Hand-held vacuum pump – To apply vacuum and test valve sealing and operation.
- 12V power source with jumper wires – For bench testing the solenoid (battery, fused jumper leads).
- Scan tool (optional but helpful) – To command the valve open/close and monitor live data.
- Safety glasses and gloves – Always protect yourself when working near fuel vapors and electrical systems.
Step-by-Step Quick Checks: From Visual to Electrical
1. Visual Inspection
Begin with the basics. Locate the purge valve – typically mounted near the intake manifold or on the EVAP canister. Follow the vacuum line from the throttle body or intake. Check for:
- Cracked or broken vacuum hoses connected to the valve.
- Loose or corroded electrical connector.
- Physical damage to the valve body.
- Signs of fuel seepage around the valve.
If everything looks intact, move to the next step.
2. Electrical Resistance Check (Multimeter)
The purge valve is a solenoid with a specific resistance range. Disconnect the electrical connector and measure resistance across the two terminals.
- Typical resistance for most purge valves: 20–40 ohms (check service manual for exact specs).
- If resistance is out of range (open circuit, short, or far from spec), the solenoid is faulty and should be replaced.
Note: Some valves have internal diodes; if you suspect polarity sensitivity, reverse leads or consult the manual.
3. Bench Test with 12V Supply
Remove the valve from the vehicle (noting hose orientations). Using fused jumper wires, apply 12V directly from the battery to the valve terminals. You should hear a distinct click as the solenoid activates. No click indicates a seized or burnt coil.
Important: Do not keep voltage applied for more than a few seconds to avoid overheating the coil.
4. Vacuum Test (Hand Pump)
With the valve off the vehicle, connect a hand vacuum pump to the port that normally faces the intake manifold (or whichever port is appropriate – usually there are two ports: one from canister, one to intake).
- Apply vacuum while the valve is not powered – it should hold vacuum with no leakage. If it bleeds down, the valve is stuck open or leaking internally.
- Now apply 12V to open the solenoid; vacuum should release immediately. If it doesn't release, the valve is stuck closed.
- For valves with three ports, ensure you understand the flow direction; many purge valves are normally closed.
5. On-Car Functional Test (with Scan Tool)
If you have access to a scan tool, you can command the purge valve open while monitoring engine data:
- Connect scan tool and go to Active Test or Output Test mode (if supported).
- Command the purge valve to open while watching Fuel Trim (STFT/LTFT) or O2 sensor readings.
- When the valve opens, you should see fuel trims adjust (typically go negative, indicating mixture enrichening) and O2 sensor voltage change. No change suggests the valve isn't flowing (stuck closed, blocked lines, or wiring issue).
Caution: This test should be performed with engine at operating temperature and stable idle. Some manufacturers require specific conditions for the purge valve to operate.
6. Check for Vacuum at Idle (Stuck-Open Diagnosis)
A common failure is the purge valve stuck partially open. To verify, with engine idling, disconnect the vacuum hose at the intake manifold side of the valve. Place your finger over the port; you should feel no vacuum if the valve is commanded closed. If you feel strong vacuum, the valve is likely stuck open or the PCM is erroneously opening it (less common). Reconnect the hose and monitor idle quality – if idle improves when you pinch the hose closed, the valve is leaking.
Quick Reference Table: Purge Valve Test Summary
| Test | Procedure | Expected Result | Fault Indication |
|---|---|---|---|
| Resistance | Measure across terminals | 20–40 ohms (spec) | Open or short circuit |
| Power click | Apply 12V momentarily | Audible click | No click → coil or mechanical seize |
| Vacuum hold (off) | Apply vacuum to port (unpowered) | Holds vacuum | Leaks down → valve open |
| Vacuum release (powered) | Apply 12V while holding vacuum | Vacuum releases | Vacuum holds → valve stuck closed |
| On-car flow test | Command open with scan tool; monitor fuel trim | Fuel trim changes | No change → blockage or electrical fault |
Verification After Repair
Once you've replaced a faulty purge valve or cleared a blockage, proper verification ensures the EVAP system is functioning correctly:
- Clear diagnostic trouble codes with a scan tool and perform a drive cycle to allow the EVAP monitor to run.
- Monitor freeze frame data to ensure fuel trims return to normal range.
- Perform a smoke test if you suspect additional leaks – a smoke machine can reveal small leaks in hoses, canister, or connections.
- Verify no vacuum leaks at the purge valve with engine idling (as described earlier).
Most importantly, ensure the Check Engine Light stays off and the vehicle passes any emissions readiness tests.
Common Pitfalls and Pro Tips
- Don't overlook the wiring – Intermittent electrical issues can mimic a bad valve. Check for broken wires, corroded pins, and proper ground.
- Check the fuse – Many EVAP systems share a fuse with other circuits; a blown fuse can disable the purge valve entirely.
- Consider the entire EVAP system – A purge valve code doesn't always mean the valve is bad; it could be a wiring issue, clogged lines, or even a faulty PCM driver.
- Use manufacturer-specific data – Resistance values and test procedures vary; always consult your vehicle's service manual for exact specifications.
- Beware of aftermarket parts – Some cheap aftermarket purge valves may not meet OE specs, leading to recurring issues. Quality parts matter.
Conclusion: Quick Checks Save Time and Money
Mastering the quick checks for an EVAP purge valve empowers any car enthusiast or DIY mechanic to diagnose a common emissions system problem without guesswork. With just a multimeter, a hand vacuum pump, and a few minutes of your time, you can determine whether the purge valve is the culprit behind a Check Engine Light or drivability complaint. Remember that the EVAP system is a sealed network; any fault can cause headaches, but methodical testing—starting with the purge valve—often leads to a swift resolution.
Keep these steps in your mental toolbox, and you'll be well on your way to becoming an EVAP system troubleshooter. Happy wrenching!