

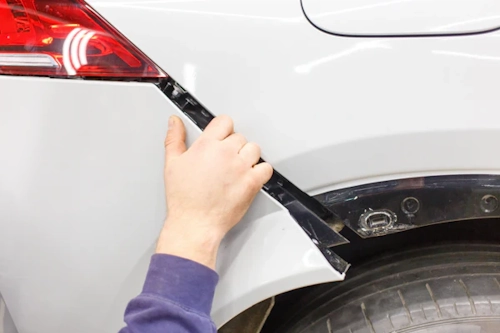
This guide walks you through choosing the right bumper or fender (wing) and, more importantly, how to remove, inspect, and securely install it — with an emphasis on the fastenings: clips, bolts, rivets, tabs and welded joints. It is written for car owners, DIY mechanics and workshop professionals who need a clear, practical, and safe workflow. Because every car is different, always consult the model-specific repair manual for torque specs and special steps.
Why proper fit matters
A correctly fitted bumper or fender does more than look right. Proper mounting:
- Ensures crash-energy zones behave as designed.
- Prevents vibrations and rubbing that damage paint and components.
- Maintains correct gaps for aerodynamics, sealing and headlight aiming.
- Keeps sensors (parking, radar, ultrasonic) functioning and aligned.
Overview: choices before you start
- OEM vs aftermarket: OEM parts generally fit without modifications; aftermarket parts may require adjustment, filler or drilling. Consider cost, finish and availability.
- Painted vs unpainted: Painted parts save time but inspect finish; unpainted parts allow custom color matching but require prep and painting.
- Complete assembly vs shell only: Some bumpers include reinforcement, absorbers and brackets — others are just the cover. Decide based on damage and local regulations.
- Sensors, trims and mounts: Make sure the part has provisions for parking sensors, fog lights, grilles, trims and brackets used on your car.
Tools and consumables checklist
- Socket set and wrench set (metric & imperial as required)
- Torx, Philips, flat screwdrivers
- Trim removal tools / plastic pry tools
- Pliers, needle-nose, snap-ring pliers
- Panel clips and fastener kit (matching OEM types)
- Rivet gun and blind rivets (if needed)
- Drill and correct-size drill bits (for rivets or stubborn spot weld drill-out)
- Jack and axle stands (or lift)
- Masking tape, soft mallet, shims (cardboard or plastic), clamps
- Anti-seize, thread locker (medium strength), seam sealer, rust inhibitor
- Protective gear: gloves, safety glasses
- Multimeter (for checking sensors/wiring)
Types of fastenings you will meet
Knowing what holds a bumper or fender in place helps you remove and reinstall without breaking parts.
- Push rivet / plastic clip
- Common on wheel arch liners and bumper flanges. Remove with trim tool to avoid breaking the head.
- Phillips / Torx / Hex screws
- Used at visible edges and inner supports. Use correct bit size to avoid cam-out and stripped heads.
- Bolts and nuts
- Secure brackets, reinforcements and crash beams. Often require access from behind an inner wing or from under the car.
- Blind (pop) rivets
- Used where access is single-sided. Drill out to remove; re-fit with matching rivets or replace with bolts if you can access both sides.
- Plastic welds / spot welds
- Rare on bumper covers but common on inner supports and reinforcements. Professional repair often preferred.
- Welded seams
- On structural panels (inner fender, wing inner brace). Welding, grinding and seam sealing required if altered.
- Snap-fit tabs
- Very common on modern bumpers. Tabs are brittle with age; warm plastic slightly (not hot) to increase flexibility during removal.
Pre-removal checklist
- Document the current fit: Take photos of panel gaps, connector locations and sensor positions.
- Disconnect battery if you will be handling airbags or proximity sensors — on many vehicles, radar or ultrasonic sensors are connected to safety systems.
- Raise the vehicle safely if access to wheel arches or undertray is required. Use axle stands or a proper lift.
- Free up wheel arch liners and splash guards to expose bumper fasteners.
- Gather replacement fasteners — the most common failure during refit is missing or broken clips.
Step-by-step: Removing a bumper or fender
This generalized procedure applies to most front bumpers and front fenders (wings). Rear bumpers are similar but may include parking sensors and exhaust clearances.
- Remove trim pieces and grilles — many bumpers have decorative grilles or trims held by clips. Use plastic trim tools to pry them off without scratching paint.
- Remove lights and electrical connectors — fog lamps, indicator clusters, parking sensors. Label each connector with tape to simplify reconnection.
- Unscrew visible fasteners — on top edge under the hood, under the bumper, and inside the wheel arch. Keep bolts and clips organized in labeled containers.
- Release wheel arch liners — they often conceal fasteners for both bumper and fender. Fold aside or remove as needed.
- Support the bumper — once clearest fasteners are removed, support the cover with a helper or place padded blocks under it to stop it falling.
- Check for hidden fasteners — some cars have hidden screws under the lower valance or behind trims. Wiggle gently to detect remaining attachments.
- Separate the bumper/fender — carefully disengage tabs; for brittle older plastics, warm with a heat gun at low setting if necessary (short bursts, keep 30–40 cm distance).
- Inspect brackets and mounts — examine any bent brackets, broken tabs or rusted bolts that need replacement before refit.
Pre-fit inspection and repair
Before installing the new part:
- Check mounting points for geometry and damage. Bent brackets should be straightened or replaced.
- Replace snapped plastic clips and worn studs. Never reuse brittle push-clips — they fail later and can rattle.
- Fit any retained supports, absorbers or reinforcements to the replacement component if they were removed from the old unit.
- If you’re fitting an aftermarket shell, pre-fit and check alignment before painting — minor trimming may be required around wheel-arch flanges or lamp openings.
Step-by-step: Installing and aligning the bumper or fender
- Dry fit first: Lift the unit into position without tightening fasteners. Use one or two bolts to hold it loosely.
- Align gaps: Check panel gaps at multiple points (headlight to bumper, bumper to wing, door to wing). Use shims or soft block clamps to achieve even spacing. A gap gauge is useful for precision; cardboard strips also work for DIY.
- Adjust mounts: Many vehicles have slotted holes or adjustable brackets — slide the mount until gaps are consistent before tightening.
- Sequential tightening: Start by hand-threading all bolts and clips. Tighten in a logical order: center, then edges, rechecking gaps as you go. Avoid over-tightening plastic bolts which can crush or deform mounting points.
- Fasteners: choose correct replacement types:
- Plastic push-clips: replace with OEM-style clips.
- Bolts/nuts: use anti-seize on threads where aluminum meets steel; apply correct torque if known.
- Blind rivets: use same diameter/length as original. Consider replacing with a short bolt & nut if access allows.
- Reconnect lights and sensors: Reattach wiring harnesses, secure connectors with locking tabs and route wiring back through grommets. Test each electrical component before finalizing the fit.
- Sealing and anti-corrosion: Apply seam sealer where hidden panels meet or where fasteners pass through metal. Use rust inhibitor spray on exposed metal brackets.
- Final check: Walk around the car and check for fit, paint contact (no rubbing), and even gaps. Confirm headlights alignment and test drive to listen for rattles.
Common problems and fixes
- Rattles after fit: Identify source by hand pressure while car is stationary, or have a helper drive slowly while you listen. Add foam pads or replace missing clips.
- Uneven gaps: Loosen and re-adjust slotted mounts; check for bent inner supports. Small differences can be corrected by loosening adjacent panel bolts and nudging panels.
- Broken tabs that cannot be replaced: Use reinforcement plates and bolts, or plastic welding for cosmetic areas. For structural bracket failure, weld or replace the bracket.
- Sensor misalignment: Parking sensors must sit flush and at the correct angle. If the sensor holes in aftermarket bumpers are off, use adapter mounts or position sensor in a small trimmed recess.
Safety notes and legal considerations
Always follow these safety rules:
- Work on a flat, stable surface and use stands — never rely on a jack alone.
- Disconnect battery when working near airbags or high-voltage systems.
- Comply with local regulations regarding lighting, reflectors and bumper modifications — modifications that affect reach or height may be illegal or fail inspection.
- After any repair that affects crash structures, consider a professional assessment — correct energy absorption depends on correct bracket geometry and absorber fit.
Final tips for a professional finish
- Keep an inventory of replacement clips and fasteners — it’s the easiest way to avoid long delays during reassembly.
- Label and store all removed hardware; a simple compartment box keeps bolts and clips organized by location.
- When fitting painted parts, protect finish with soft cloths and avoid sharp contact with tools.
- If painting, mount the part on a frame and inspect the paint cure before final fit — solvent or overspray can affect adjacent parts.
- Document the repair with photos — useful for warranty claims and resale transparency.
Quick reference: do’s and don’ts
Do: Use OEM-style clips, check sensor fit, replace brittle plastic fasteners, and check alignment before final torque.
Don’t: Over-tighten plastic screws, reuse corroded bolts without treatment, ignore missing support pads, or skip electrical tests.
Conclusion
Fitting a bumper or fender correctly takes patience, the right parts and respect for the fasteners that hold them together. By understanding the types of clips, bolts and rivets you’ll encounter and following a methodical removal–inspect–dry-fit–adjust–tighten workflow, you’ll reduce rework, eliminate rattles and ensure the cosmetic and structural integrity of the repair. When in doubt about structural components, sensor calibration or airbag systems, consult or hire a professional — safety first.
If you would like a vehicle-specific checklist (bolt sizes, clip types and torque values) for a particular make/model, tell me your car’s year and VIN or model code and I’ll generate a tailored table you can print and take to the garage.