

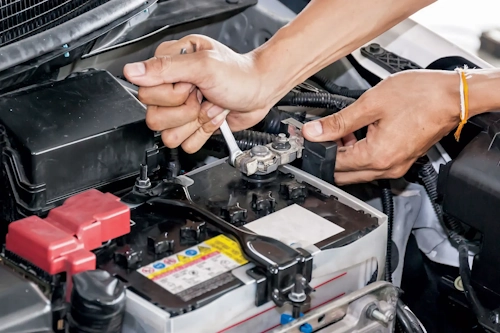
Every car enthusiast should master the fundamental skill of battery disconnection—whether you're performing maintenance, storing your vehicle, or replacing this crucial component. Proper technique ensures both your safety and your vehicle's electrical system integrity.
Why Would You Need to Disconnect Your Battery?
Several scenarios necessitate battery disconnection:
- Vehicle Storage: Prevent battery drain when your vehicle won't be used for extended periods (typically beyond two weeks) :cite[2]
- Electrical System Maintenance: Essential safety precaution when working on automotive electrical systems
- Battery Replacement: Necessary first step when installing a new battery
- System Reset: Sometimes required to reset vehicle computers or error codes
Essential Safety Precautions
Before beginning, prioritize safety with these critical measures:
- Always turn the engine off and remove keys from the ignition :cite[3]
- Wear protective equipment: safety goggles and gloves :cite[2]
- Remove metallic jewelry that could accidentally contact terminals
- Work in a well-ventilated area to avoid exposure to battery gases
- Keep sparks and open flames away from the battery
- Have baking soda and water available to neutralize acid spills
Remember that improper battery handling can cause serious injury, damage your vehicle's electronics, or even destroy the battery itself :cite[3].
Tools You'll Need
Gather these simple tools before starting:
- Socket wrench set with various sizes (typically 8mm, 10mm, or 13mm)
- Wire brush for terminal cleaning
- Battery terminal puller (optional but helpful for stubborn connections)
- Baking soda and water solution for corrosion cleaning
- Petroleum jelly or anti-corrosion spray
Step-by-Step Disconnection Process
Step 1: Locate Your Battery
Most vehicles house the battery under the hood, though some models place it in the trunk or under rear seats. Consult your owner's manual if you have difficulty locating it :cite[2]:cite[3].
Step 2: Identify Positive and Negative Terminals
Correctly identify terminals before proceeding:
- Negative Terminal: Marked with a minus sign (-), usually black, may have black cap
- Positive Terminal: Marked with a plus sign (+), usually red, may have red cap
Modern vehicles typically follow this color coding, but always verify by the symbols rather than relying solely on color :cite[2].
Step 3: Disconnect the Negative Terminal First
This critical safety step prevents electrical shorts:
- Use your wrench to turn the negative terminal nut counterclockwise
- Once loose, carefully twist and lift the cable off the terminal
- Position the cable away from the battery to prevent accidental contact
Always disconnect negative first because completing the circuit through your tools to ground can cause dangerous short circuits :cite[3].
Step 4: Disconnect the Positive Terminal
Repeat the process with the positive terminal after securing the negative cable. Once removed, isolate the positive cable end by wrapping it in a non-conductive material such as a towel :cite[3].
Step 5: Battery Removal (If Necessary)
For complete battery removal:
- Locate and remove the battery hold-down clamp (secured with nuts)
- Carefully lift the battery out, keeping it level to avoid acid spills
- Place on a stable, dry surface away from children and pets
Remember that car batteries are surprisingly heavy (typically 30-50 pounds), so lift with your legs, not your back.
Terminal Cleaning and Maintenance
While the battery is disconnected, take advantage of the opportunity to clean the terminals:
- Create a paste of baking soda and water
- Use a wire brush to scrub away corrosion from terminals and cable ends
- Rinse with clean water and dry thoroughly
- Apply petroleum jelly or anti-corrosion spray to prevent future buildup
Regular maintenance prevents electrical resistance that can impair starting performance.
Reconnection Procedure
When ready to reconnect:
- Position the battery securely in its tray and reinstall the hold-down clamp
- Connect the positive terminal first, tightening securely
- Connect the negative terminal second, ensuring a snug fit
- Apply anti-corrosion treatment to both terminals
After reconnection, test your vehicle's operation including headlights, horn, and other electrical components to ensure proper connection.
Special Considerations for Modern Vehicles
Newer vehicles with sophisticated electronics require extra caution:
- Some systems may require a memory saver to preserve electronic settings
- Certain European models may need specialized computer recalibration after disconnection
- Hybrid and electric vehicles have high-voltage systems that should only be serviced by professionals
Common Mistakes to Avoid
Even experienced enthusiasts can make these errors:
- Disconnecting positive first: Risks creating a short circuit through tools to ground
- Overtightening terminals: Can strip threads and damage battery posts
- Ignoring corrosion: Leads to increased electrical resistance and starting problems
- Forgetting radio codes: Some older vehicles require security codes after battery disconnection
When to Seek Professional Help
While battery disconnection is generally straightforward, consult a professional if:
- Your vehicle is a hybrid or electric model (high-voltage systems are dangerous)
- Terminals are severely corroded or damaged
- Battery cables appear frayed or damaged
- You lack the proper tools or confidence to complete the procedure safely
Frequently Asked Questions
How often should I disconnect my car battery?
Typically only when performing maintenance, replacing the battery, or preparing for extended storage. Regular disconnection isn't necessary for most vehicles.
Will disconnecting my battery reset the check engine light?
It may temporarily clear codes, but underlying issues causing the light will need to be addressed for permanent resolution.
How long can I leave my battery disconnected?
Batteries can safely remain disconnected indefinitely, though they may slowly self-discharge over several months.
Conclusion
Mastering proper battery disconnection technique empowers you to maintain your vehicle confidently and safely. By following these detailed steps and safety precautions, you can ensure your electrical system remains protected while you work on your vehicle. Remember that safety should always be your priority—when in doubt, consult a professional technician.
Proper battery maintenance, including correct disconnection and reconnection procedures, extends battery life and ensures reliable vehicle operation. With this knowledge, you're better equipped to handle basic automotive electrical tasks and keep your vehicle in peak condition.