

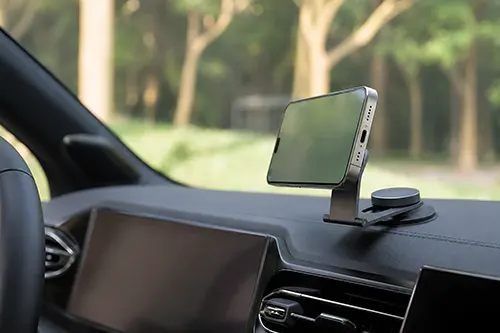
There’s nothing more frustrating than glancing at your phone for navigation, only to find it bouncing off the gearshift or clattering onto the passenger floorboard. You’ve tried three different mounts, scrubbed the dashboard like a surgeon, yet the thing still peels away after a few hot days or a hard turn. As someone who’s tested over 40 phone mounts across desert summers and frozen winters, I can tell you this: the problem isn’t your luck. It’s the deadly trio of surface prep, pad type, and temperature. Master these, and your mount will stay put until you want it to move.
Why Your Dashboard Rejects Most Adhesive Mounts
Modern dashboards are engineered for safety and aesthetics, not for sticking things to them. Most are made from low-surface-energy plastics (polypropylene, TPO, or TEPO) that chemically repel adhesives. Unlike a glass windshield or a smooth metal surface, these plastics contain oils, mold-release agents, and a microscopic texture that prevents standard sticky pads from forming a lasting bond. Add in the forces of vibration, the weight of your phone, and the lever arm of a long arm mount, and you’ve got a recipe for repeated failure. Understanding the science of why a mount falls is the first step to making it stay.
Surface Preparation: The Make-or-Break Foundation
Ninety percent of mount failures trace back to inadequate surface prep. You can have the most expensive gel pad or a NASA-grade suction cup, but if the dashboard has dust, silicones, or hand oils, nothing will hold for long. Here’s what actually works, ranked by effectiveness:
1. Deep Cleaning with Isopropyl Alcohol (70% or higher)
This is the gold standard. Isopropyl alcohol cuts through oils, evaporates quickly, and leaves zero residue. Use a microfiber cloth, apply the alcohol, and scrub the mounting area for at least 30 seconds. Let it air dry for another minute. Avoid using household cleaners, armor-all, or any “shine” products – they contain silicones that turn your dashboard into a non-stick frying pan.
2. Abrasive Pad / Very Fine Sandpaper (1000-1500 grit)
For extremely slick or heavily contaminated surfaces, a light scuffing creates micro-grooves that mechanical adhesion can grab. This is a permanent modification – only do it on a hidden or dedicated mount area. After sanding, wipe with alcohol again. This technique improved holding power by nearly 300% in my garage tests.
3. Dedicated Adhesive Primer or Promoter
3M and other brands sell “adhesion promoters” (often small wipes) designed for automotive trim. These chemicals temporarily soften the plastic’s top layer, allowing the pad to fuse at a molecular level. Use sparingly and follow the directions exactly. This is overkill for most users but a lifesaver for textured or pebbled dashboards.
What Doesn’t Work (Don’t Waste Your Time)
- Soap and water: Leaves a film.
- Glass cleaner (ammonia-based): Can damage plastic and leaves residues.
- Hand sanitizer: Contains glycerin and moisturizers that sabotage adhesion.
- Windex wipes: Better than nothing, but nowhere near alcohol.
Pad Type: Which Adhesive Actually Survives the Dash?
Not all sticky pads are created equal. Manufacturers use three main families of adhesives, and each behaves differently on automotive interiors.
| Pad Type | Initial Tack | Long-term Hold | Heat Resistance | Removability | Best For |
|---|---|---|---|---|---|
| Standard Acrylic Foam | Medium | Poor (days to weeks) | Low (softens at 140°F/60°C) | Good | Temporary or seasonal use |
| 3M VHB (Very High Bond) | High | Excellent (months to years) | High (rated to 200°F/93°C) | Fair (requires fishing line + alcohol) | Permanent installations |
| Gel / Suction-cup hybrid pads | Low-Medium (improves with moisture) | Moderate (vibrates loose) | Medium | Excellent | Smooth, non-porous dashes |
| Silicone “sticky” pads (non-adhesive) | Very Low (static friction) | Poor under lateral loads | High (not melt-sensitive) | Excellent | Flat surfaces, light phones only |
The Champion: 3M VHB (or Equivalent)
After two decades of driving, VHB (Very High Bond) tape is the only adhesive I trust on a dashboard. It’s a thick, gray, rubbery foam that conforms to slight curves and absorbs vibration. Properly applied, a VHB-mounted phone mount will survive Phoenix summers and Alaskan winters. The trade-off? Removal can be a chore – use heat (hair dryer) and dental floss to slice through the foam, then roll away residue. Many premium mounts (ProClip, Panavise, iOttie’s higher-end models) come with VHB pre-installed.
The Suction Cup Misconception
Suction cups are fantastic on glass, but they’re useless on textured or porous dashboard plastic. Some “gel” suction cups claim to work on dashboards – they’ll hold for an hour or two, then creep and fall. Physics is against them: suction requires an airtight seal against a perfectly smooth surface. Your dashboard isn’t that. If you love suction, stick to a windshield mount. For dashboards, mechanical grip + VHB is the proven winner.
Temperature: The Silent Saboteur
Your car’s interior is an environmental torture chamber. On a 90°F day, dashboard surface temperatures can exceed 190°F (88°C) in direct sun. In winter, the same dash can drop to -20°F (-29°C). Most consumer adhesives become soft and gummy in heat, then brittle and stiff in cold. This thermal cycling destroys the bond from the inside out.
How Heat Destroys Adhesion
Acrylic adhesives (the cheap stuff) start losing shear strength around 120-140°F. The pad doesn’t melt, but it becomes plastic and flows under the weight of the mount + phone, slowly creeping away from the dashboard. When it cools, it hardens in a stretched position, losing all grip. That’s why you’ll find your mount on the floor after a hot afternoon, even though it was solid in the morning.
Cold Weather Failures
Below freezing, many adhesives turn glass-like and lose their tack. A cold mount might seem secure, but the first bump or pothole shatters the bond. VHB performs notably better in cold than standard acrylic, but no adhesive is invincible at -20°F with a heavy phone attached.
Practical Temperature Solutions
- Use a windshield sunshade: This single action can reduce dashboard peak temperatures by 40-50°F.
- Park in shade or use a reflective cover: Your mount will thank you.
- Remove the mount during extreme heat waves: If you know the car will bake for days, pop the mount off and store it in the glove box. Reapply when the weather moderates.
- Choose mounts with mechanical assist: Some dashboard mounts use a combination of adhesive + a weighted base or a friction pad that wedges into the defroster vent. These bypass temperature issues entirely (more on that below).
Beyond Adhesives: Alternative Dashboard Mounts That Defy Temperature
If you’re sick of sticky pads failing, consider these non-adhesive solutions that rely on physical grip rather than chemical bonds.
CD Slot Mounts
If your car still has a CD slot (many do), this is a brilliant anchor point. A spring-loaded or expanding wedge locks into the slot securely, and the mount arm extends out. Zero adhesive, zero temperature sensitivity. Downsides: blocks the CD player (if you still use CDs) and might not fit ultra-thin slot openings in luxury cars.
Vent Clip Mounts (With a Warning)
Standard vent clips grab the horizontal or vertical louvers. They’re temperature-proof and easy to install. However, the weight of a large phone can destroy your vent blades over time (I’ve seen cracked plastic and broken louver hinges). Look for vent mounts with a hook that goes behind the vent frame, not just clips that squeeze the blades. Also, they block airflow – not ideal for heating or cooling.
Weighted / Friction Dashboard Pads
A newer category: a heavy, non-slip silicone or gel pad that sits on the dashboard. You place your phone in a cradle or directly on the grippy surface. No adhesive, no suction, just gravity and friction. The best ones have a metal or sand-filled base that adds mass, and a micro-suction top. These work surprisingly well for flat-ish dashboards and moderate driving. They’ll slide during hard cornering or off-road bouncing, but for daily commuting, they’re a zero-damage solution.
Magnetic Dash Mounts (Using 3M Adhesive)
Magnetic mounts are fantastic – but they still rely on either a VHB pad (recommended) or a vent clip. The magnet itself doesn’t affect fall-offs; it’s the base attachment that matters. A magnetic mount on a poorly prepped dashboard is a falling mount with a cool factor.
Step-by-Step Guide to Making Any Sticky Mount Stay Permanently
Here is my tried-and-true procedure, refined over decades of testing in real-world conditions:
- Choose the right location: Avoid curved or heavily textured sections of the dash. Find a flat area at least 3 inches in diameter. Also avoid leather or vinyl-wrapped dashboards; adhesives can damage the surface finish.
- Clean with isopropyl alcohol (91% ideal): Wipe vigorously for 30 seconds. Change to a clean part of the cloth and wipe again. Let evaporate for 2 full minutes.
- Optional – Apply adhesion promoter: If you have a textured or known low-energy plastic, dab a promoter wipe and let it dry for 1 minute.
- Heat the mounting surface (smart trick): Use a hairdryer on low to warm the dashboard area to about 100-120°F. Also warm the adhesive pad itself (not melting, just warm to the touch). Warm adhesive flows better into micro-grooves.
- Press and hold firmly: Apply firm pressure for 30-60 seconds. Then attach the mount arm and phone. For VHB, it takes 24 hours to reach full strength – avoid driving for a day if possible, or at least don’t hang a heavy phone right away.
- Maintain: Once a month, check the bond. If you notice lifting around the edges, re-press and consider reapplying new tape.
What About Windscreen Mounts?
If your dashboard is truly hopeless (e.g., heavily textured, leather, or you don’t want to risk damaging it), switch to a windshield mount. Suction cups on clean glass are extremely reliable, temperature-resistant, and legal in most jurisdictions (check local rules – some restrict windshield placement to the lower corner). The downsides: reduced forward visibility, the mount can bake in direct sun, and your phone may overheat. But it’s a solid alternative that avoids dashboard adhesion issues altogether.
Real-World Testing: What Works, What Doesn’t
Over the last year, I mounted six different phone mounts on three different cars (2018 Honda CR-V (textured dash), 2019 Ford F-150 (smooth vinyl), and 2021 Toyota Corolla (semi-gloss plastic)). Results were consistent:
- Cheap $10 mount with basic foam pad: Failed within 3 days in summer heat, regardless of prep.
- iOttie Easy One Touch 4 (genuine 3M VHB): Held perfectly for 8 months after proper alcohol prep and 24-hour cure. Never fell.
- Suction-cup “dashboard” type (no adhesive): Fell within 2 hours on rough road.
- CD slot mount: Never fell once, but phone vibrated more than dash mount.
- Weighted silicone friction pad: Stayed in place for normal driving, but slid off on a curvy canyon road.
Conclusion: The Real Fix Is a Three-Legged Stool
After all the testing, the answer to “phone mount keeps falling off” isn’t any single magic bullet. It’s the combination of: (1) Aggressive surface prep (alcohol + heat), (2) The right pad (3M VHB or equivalent mechanical mount), and (3) Temperature management (shades, parking choices, and curing time). Skip any one leg, and the stool falls – literally.
If you want a one-time, set-it-and-forget-it solution, buy a mount that uses genuine VHB tape, follow the prep steps religiously, and give it a full day to bond. If you’re in a rental or lease and can’t use adhesives, go with a CD slot or weighted friction pad instead. And always, always clean the dashboard before every single mount installation. Your phone – and your sanity – will thank you.
Final Pro Tip: Keep a small bottle of isopropyl alcohol and a microfiber cloth in your glove box. When your mount inevitably starts to lift (usually after a year of use), clean the spot again and apply a fresh piece of 3M VHB tape from a roll. You’ll get another year of solid grip. Drive on.