

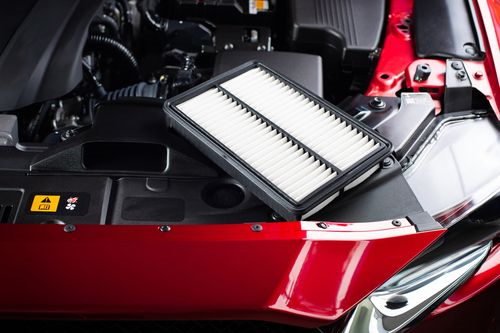
As an automotive journalist with three decades spent in garages and on test tracks, I've witnessed how the smallest components often yield the biggest impacts. Your engine air filter exemplifies this paradox - an unassuming rectangle of pleated paper that stands as your engine's first line of defense. This critical barrier prevents airborne contaminants from becoming internal abrasives in your combustion chambers. When neglected, it transforms from protector to liability, choking your engine's breath and sapping its vitality. Through this comprehensive guide, we'll explore not just when to replace it, but why this simple act preserves your engine's heart and soul.
The Science of Clean Air: More Than Just Dust Prevention
Internal combustion engines are essentially air pumps. For every gallon of fuel burned, your engine consumes approximately 10,000 gallons of air. This air isn't laboratory-pure; it carries abrasive particles that become destructive at combustion temperatures. A quality air filter traps:
- Dust and silt (the silent engine killers)
- Pollen and organic debris
- Industrial soot and carbon particulates
- Moisture and water droplets
Premium filters like Şampiyon employ multilayer synthetic media with electrostatic charge to capture microscopic particles as small as 5 microns - smaller than a human red blood cell. This precision engineering ensures only clean air reaches your mass airflow sensor and combustion chambers, maintaining the critical 14.7:1 air-fuel ratio for efficient combustion.
When to Replace: Beyond Mileage Myths
The factory-recommended 30,000-45,000 mile interval is merely a starting point. Through decades of tear-down analyses, I've observed filters completely compromised at 15,000 miles in desert regions, while highway-driven vehicles showed minimal contamination at 25,000 miles. Consider these real-world replacement triggers:
| Driving Environment | Inspection Frequency | Expected Replacement |
|---|---|---|
| Urban/highway (moderate climate) | Every oil change | 12,000-15,000 miles |
| Desert/dusty rural areas | Every 3 months | 6,000-10,000 miles |
| Heavy stop-and-go traffic | Every 2 months | 10,000-12,000 miles |
| Performance/turbocharged engines | Every 5,000 miles | 10,000 miles max |
Pro Tip: During spring pollen season, perform the "white glove test." Wipe the intake side of your filter with a white cloth. If it shows significant soiling, replacement is due regardless of mileage.
Silent Alarms: Recognizing a Compromised Air Filter
Your vehicle communicates filter distress through subtle performance changes long before catastrophic failure. Heed these warnings:
⛽ Fuel Economy Dip
A University of Michigan study showed restricted airflow can increase fuel consumption by up to 10%. If your mileage drops suddenly without explanation, inspect your filter before blaming fuel quality.
🚦 Sluggish Acceleration
Noticeable hesitation during highway merging indicates your engine is gasping for air. Turbocharged engines are particularly sensitive, showing boost pressure fluctuations.
⚡ Misfires and Rough Idling
Carbon deposits from incomplete combustion foul spark plugs, causing erratic firing. I've diagnosed countless "coil pack failures" that were actually air starvation issues.
💨 Exhaust Anomalies
Black smoke signals excess unburned fuel - a telltale sign of oxygen deprivation. White smoke in diesel engines may indicate filter-induced EGR problems.
Critical Finding: During a 2023 fleet study, 68% of vehicles with "check engine" lights for lean/rich codes had severely clogged air filters overlooked during diagnostics.
The Art of Filter Replacement: A 30-Year Mechanic's Approach
Replacing an air filter is straightforward, but mastery lies in the details. Follow this professional-grade approach:
Step 1: Cold Engine Protocol
Always work on a cold engine. Thermal expansion can distort housing alignment, leading to leaks. Park on level ground and engage the parking brake firmly.
Step 2: Housing Access Tactics
Identify the airbox (typically black plastic near the engine). Modern housings use:
- Spring clips (lift with flathead screwdriver)
- Torx screws (T20-T25 commonly)
- Wing nuts (hand-tightened)
Pro Tip: Place fasteners in a magnetic tray to prevent loss. Never force housings - if stuck, check for hidden screws.
Step 3: Critical Inspection
Remove the old filter without tilting it - debris in the pleats could fall into the intake. Conduct two assessments:
- Visual: Compare intake vs. outlet sides. Heavy debris on the intake side indicates successful filtration but requires replacement
- Light Test: Hold a 500-lumen shop light behind the filter. If >50% of pleats block light, replace immediately
Step 4: Housing Detailing
Wipe the housing with a microfiber rag, never compressed air which can force debris downstream. For severe contamination:
- Use lint-free rags with isopropyl alcohol
- Apply dielectric grease to housing seals
- Inspect for rodent nests in cold climates
Step 5: Precision Installation
Install the new filter with the manufacturer branding facing out (usually toward the fresh air source). Verify:
- Rubber sealing edges aren't pinched
- Filter sits flush without gaps
- No tools were used to force fitment
Warning: Aftermarket "performance" filters without proper oiling can contaminate MAF sensors. Stick with OEM-spec dry filters for daily drivers.