

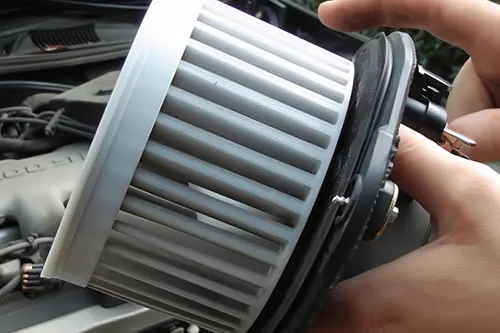
The Classic Symptom: Full Speed or Nothing
You turn the key, adjust the climate control fan speed—and nothing happens on settings 1, 2, or 3. But when you click it to the highest setting (usually position 4 or MAX), the blower roars to life with full force. This is one of the most common and frustrating HVAC (heating, ventilation, and air conditioning) issues across nearly every vehicle brand, from Ford and GM to Toyota and BMW. The good news: the diagnosis is usually straightforward, and the repair is often within reach of a dedicated DIY enthusiast. The bad news: if you ignore it, a melted wiring connector or a burned control module can turn a $20 fix into a $200 headache.
Understanding why the blower works on high but not on lower speeds is the key. The blower motor itself is rarely the culprit—it receives full battery voltage on the high setting and runs fine. The problem lies in the components that reduce voltage for slower speeds. On most vehicles, that's either a blower motor resistor (older and many newer cars) or a blower motor control module (also called a final stage unit, common in European and late-model vehicles). And very often, the root cause is a melted or corroded electrical connector caused by resistance, age, or a failing blower motor drawing too much current.
How a Blower Motor Speed Control System Works (In Plain English)
Your car's blower motor is a simple 12-volt DC motor. To make it spin slowly, you need to reduce the voltage reaching it. On the highest setting, the switch simply sends full battery voltage directly to the motor. For lower speeds, the system inserts resistance into the circuit, dropping the voltage.
- Blower Motor Resistor: A small board with coils of wire (or ceramic resistors) that create voltage drops. It has several taps for different speeds. When you select speed 1, current flows through the highest resistance; speed 2, less resistance; speed 3, even less; speed 4 bypasses the resistor entirely. Resistors get hot—very hot—which is why they're usually mounted in the HVAC duct to be cooled by airflow. When that airflow is restricted or the resistor ages, it burns out, often killing all lower speeds but leaving high intact.
- Blower Motor Control Module (Final Stage): Instead of resistors, this uses solid-state electronics (transistors) to vary the voltage. The module receives a low-current signal from the climate control head and adjusts power to the blower smoothly. When it fails, it often fails in a way that only high speed works, or it may cause intermittent operation or a blower that runs even with the key off. These modules are more expensive but allow infinite speed control.
Both systems rely on a connector that carries high current. Over time, vibration, heat, and oxidation cause the connector terminals to loosen. Loose terminals increase resistance, which generates more heat—leading to melting, burning, and eventually complete failure of the lower speeds.
Step-by-Step Diagnosis: Resistor or Control Module?
Before you buy any parts, you need to determine which system your vehicle has and what exactly failed. Here’s a practical diagnostic routine.
1. Locate the Component
The blower motor resistor or control module is almost always attached to the HVAC housing, near the blower motor itself. On most vehicles, you can find it under the passenger side dashboard, behind the glove box, or sometimes under the hood on the firewall. Remove the trim panel or lower dash cover to expose the blower motor. Follow the wires coming from the blower motor—they lead to a small component with a wiring harness. That’s your resistor or module.
2. Visual Inspection – The Most Important Step
Once you have access, unplug the electrical connector and examine both the component and the connector. Look for:
- Melted or discolored plastic around any of the pins.
- Burnt or corroded terminals (dark, pitted, or missing metal).
- A cracked or swollen resistor board (visible through the housing).
- Signs of overheating on the control module’s metal base.
If you see a melted connector, you must repair or replace it. A new resistor or module will fail again quickly if plugged into a damaged connector.
3. Test the Resistor (If Applicable)
For a traditional resistor pack, you can perform a simple continuity test with a multimeter. Set your meter to ohms (Ω). Probe between the common input pin (usually the thickest wire, often red or orange) and each of the speed tap output pins. You should see a different resistance value for each speed—typically ranging from about 0.5Ω to 5Ω. If any reading is open (OL or infinite), that speed circuit is burned out. If all lower speeds show open but the high-speed bypass circuit is fine, the resistor is dead.
4. Test the Control Module
Modules are harder to test with a basic meter because they contain electronics. You can check for power and ground at the module’s connector. With the key on and fan switch set to a low speed, you should see a variable voltage (0-12V) on the control signal wire coming from the HVAC panel. If that signal is present but the blower doesn’t run on low, the module is likely bad. Some modules fail so that they only output full voltage (high speed) regardless of the input signal.
5. Don’t Forget the Blower Motor Itself
A failing blower motor that draws excessive current is the leading cause of melted resistors and connectors. Before installing a new resistor or module, test the blower motor. Apply 12V directly to the motor terminals (using jumper wires from the battery). It should spin freely and quietly. If it’s noisy, sluggish, or draws more than about 15 amps (check with a clamp meter), replace the blower motor along with the resistor/module. Otherwise, your new part will fail again within months.
Comparing Blower Resistor vs. Control Module
| Feature | Blower Motor Resistor | Blower Control Module |
|---|---|---|
| Typical cost | $15 – $40 | $50 – $150+ |
| Common in | Most domestic & Asian cars (1990s–2010s) | European cars (BMW, Mercedes, VW) & newer vehicles |
| Speed control | Fixed 3–4 speeds | Variable (infinitely adjustable) |
| Failure symptoms | Only high works, sometimes only one low speed works | Only high works, or blower runs constantly, or no power at all |
| Diagnosis | Simple resistance test | Requires signal voltage test |
| Heat generation | High (needs cooling airflow) | Moderate (heatsink required) |
How to Repair a Melted Blower Motor Connector
This is the most overlooked part of the repair. A melted pigtail connector is a fire hazard and will ruin your new component. Fortunately, replacement pigtails are widely available from auto parts stores and online (search for “blower motor resistor connector pigtail” for your vehicle).
Tools and Materials Needed:
- Replacement pigtail connector (matched to your vehicle’s original)
- Wire strippers/crimpers
- Heat shrink butt connectors (preferred) or solder and heat shrink tubing
- Electrical tape or zip ties
- Dielectric grease (optional, but helps prevent future corrosion)
Step-by-Step Connector Replacement:
- Disconnect the battery (negative terminal first). Safety first.
- Cut off the old, melted connector about 1–2 inches back from the damage, ensuring you have clean, uncorroded wire.
- Strip about 1/4 inch of insulation from each wire end.
- Match the wire colors to the new pigtail. If colors don’t match, refer to a wiring diagram or label the wires before cutting.
- Use heat shrink butt connectors to join each wire one by one. Crimp firmly, then apply heat to shrink the tubing and seal the joint. Alternatively, solder and cover with heat shrink.
- Once all wires are connected, plug the new pigtail into your new resistor or module.
- Reconnect the battery and test all fan speeds before reassembling the dashboard.
Pro tip: Add a small amount of dielectric grease to the connector terminals to prevent moisture ingress and future overheating.
Common Mistakes That Lead to Repeat Failure
I’ve seen DIYers replace the same resistor three times in a year. Avoid these traps:
- Not replacing a worn blower motor. A motor with worn bearings draws more current, overheating the resistor. Always test the motor or replace it proactively if it’s old.
- Ignoring a clogged cabin air filter. Restricted airflow means the resistor doesn’t get enough cooling, causing it to overheat and burn out. Check and replace your cabin filter regularly.
- Using cheap aftermarket resistors. Some budget parts have undersized resistors or poor thermal paste. Stick with OEM or reputable brands (Delphi, Standard Motor Products, genuine OE).
- Leaving the melted connector. The heat came from somewhere. If the connector is burned, the terminals have high resistance. You must cut it out.
- Forgetting to clear debris from the blower wheel. Leaves, mouse nests, or broken plastic can stall the blower or cause high current draw. Inspect the blower cage before final assembly.
When to Replace the Entire Blower Motor Assembly
Sometimes the problem isn’t just the resistor or module. If your blower motor makes squeaking, grinding, or rattling noises; if it runs but slowly even on high; or if you’ve already replaced the resistor twice, it’s time for a new blower motor. The motor itself typically costs $30–$80 and is held in by three screws. Replacing it is straightforward—access it from under the dash, unplug the wiring, remove the retaining screws, and twist the motor out of its housing. While you’re in there, clean the HVAC case and replace the cabin air filter.
Vehicle-Specific Notes
Different manufacturers have quirks. Here’s what to watch for:
- Ford (F-150, Focus, Explorer): Extremely common resistor failure. The connector almost always melts. Ford sells a repair kit (pigtail + resistor).
- GM (Silverado, Malibu, Equinox): Resistor located behind glove box. The blower motor itself often fails, taking the resistor with it.
- Toyota (Camry, Corolla): Resistor failure is common, but the connector rarely melts. However, the blower motor’s ground wire can corrode.
- BMW (3 Series, 5 Series): Uses a final stage resistor (FSR) or blower regulator. Located under the dash near the steering column. Failure often causes the blower to run with key off, draining the battery.
- Honda (Civic, Accord): Resistor is cheap and easy to access (behind glove box). Blower motor failure is less common.
Tools Every DIYer Should Have for This Job
- Digital multimeter (even a $20 one is fine)
- Trim removal tools (to pop off dashboard panels without breaking clips)
- Torx or Phillips screwdrivers (depending on vehicle)
- Wire strippers and crimpers
- Heat gun or lighter (for heat shrink)
- Flashlight and a small mirror (helpful for under-dash work)
Conclusion: You Can Fix This in an Afternoon
A blower that works only on high is rarely a crisis, but it’s a major comfort issue in winter or summer. The diagnostic process is logical: inspect the connector, test the resistor or module, and verify the blower motor’s health. In most cases, a $20 resistor and a $10 pigtail will restore full fan control. Even if you need a control module or a blower motor, the total cost is typically under $150 and the job takes two to three hours for a beginner.
The key takeaway: never ignore a melted connector. It’s a warning sign of excessive heat. Cutting it out and installing a new pigtail is cheap insurance. And always, always check the blower motor’s current draw before buttoning everything up. Do that, and your HVAC system will provide years of reliable service.
Now go grab your multimeter, pop that glove box out, and take control of your cabin comfort—at every speed, not just full blast.