

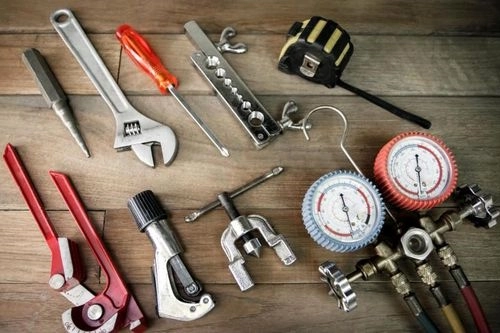
Performing a complete automotive air conditioning restoration requires specialized tools that go beyond basic mechanic's equipment. Unlike quick-fix solutions that address single components, a systematic approach with professional-grade instruments ensures thorough contamination removal, proper refrigerant handling, and long-term system reliability. This professional toolkit addresses the interconnected nature of AC systems, where compressor failure often sends debris throughout the entire system, necessitating comprehensive cleaning and validation before reassembly.
1. Manifold Gauge Sets: The Diagnostic Foundation
Manifold gauges serve as the primary diagnostic instrument for AC systems, providing real-time pressure readings that reveal the system's operational status. This tool features three colored hoses (blue for low-pressure, red for high-pressure, and yellow for refrigerant access) connected to precision gauges that measure pressure in pounds per square inch (PSI).
Critical Diagnostic Applications:
- Refrigerant Level Assessment: Low refrigerant charge manifests as low pressure on both gauges, while overcharged systems show abnormally high pressure readings
- Component Failure Identification: Compressor failures often show equalized pressures, while clogged expansion valves display abnormal pressure differentials
- Air Contamination Detection: Air in the system causes excessively high pressure on the high-side gauge
- Blockage Identification: Restrictions in the system create abnormal pressure differences between high and low sides
| Low-Side Pressure | High-Side Pressure | Likely Issue | Recommended Action |
|---|---|---|---|
| Higher than normal | Higher than normal | Overcharged system | Recover and measure refrigerant |
| Lower than normal | Lower than normal | Undercharged system | Perform leak test and recharge |
| Normal at idle, drops under load | Normal at idle, spikes under load | Condenser airflow problem | Clean condenser, check fans |
| Extremely low | Extremely high | Blocked orifice tube/expansion valve | Replace blocked component |
| Equalized pressures | Equalized pressures | Compressor failure | Diagnose compressor clutch/valves |
Professional technicians interpret gauge readings in context with ambient temperature using pressure-temperature charts. Digital manifold sets offer enhanced accuracy with integrated temperature sensors and automatic calculation of superheat/subcooling values for precision charging.
2. AC Flush Kits: Complete Contamination Removal
When AC components fail, they often distribute debris throughout the entire system. Flush kits provide pressurized solvent application to remove metallic particles, desiccant material, and sludge from condensers, evaporators, and lines. Modern flush solutions are specifically formulated to dissolve contaminants without damaging aluminum components or rubber seals.
Flushing Protocol:
- System Disassembly: Remove compressor, accumulator/drier, and expansion valve/orifice tube before flushing
- Component Preparation: Separate evaporator, condenser, and all lines/hoses
- Directional Flushing: Force solvent through components opposite normal flow direction using compressed air (typically 50-100 PSI)
- Validation: Continue flushing until exiting solvent appears completely clean
- Drying: Purge components with compressed nitrogen to eliminate residual solvent
⚠️ Critical Limitations: Never flush compressors, accumulators, or receiver-driers as these components trap debris in cavities that flushing cannot remove. Always replace these components during system overhaul.
3. Vacuum Pumps: Moisture Elimination & Leak Verification
Vacuum pumps serve the dual purpose of removing moisture and verifying system integrity. By reducing system pressure to 29 inches Hg, these pumps lower the boiling point of water, allowing moisture to vaporize and be evacuated. The vacuum process is critical because refrigerant and compressor oil are hygroscopic—they readily absorb moisture which then forms corrosive acids.
Professional Vacuum Procedure:
- Deep Evacuation: Pull vacuum to at least 29 inches Hg
- Moisture Removal Phase: Maintain vacuum for minimum 45 minutes (longer for humid climates)
- Leak Verification: Isolate the pump and monitor vacuum for 30+ minutes—pressure should not rise more than 1-2 inches Hg
- Repeat if Necessary: If vacuum isn't achieved/maintained, recheck connections and retest
| System Capacity | Minimum CFM | Recommended Pump Type | Evacuation Time |
|---|---|---|---|
| Compact Cars (1-1.5 lbs) | 3-5 CFM | Single-stage rotary vane | 45-60 minutes |
| Mid-size Vehicles (1.5-2 lbs) | 5-7 CFM | Single-stage rotary vane | 60-75 minutes |
| Large Vehicles/SUVs (2-3 lbs) | 8+ CFM | Two-stage rotary vane | 75-90 minutes |
| Heavy-duty/RVs (3+ lbs) | 10+ CFM | Two-stage with gas ballast | 120+ minutes |
High-quality two-stage pumps achieve deeper vacuums faster and maintain consistent performance over time. Regular oil changes (using specific vacuum pump oil) maintain peak efficiency and prevent moisture contamination of the oil from compromising performance.
4. Advanced Tools for Comprehensive Repairs
Beyond the three foundational tools, professional technicians utilize specialized instruments for thorough diagnostics and precision servicing:
- Electronic Leak Detectors: Ultrasonic and infrared sensors pinpoint micro-leaks as small as 0.05 oz/year
- Refrigerant Identifiers: Essential for verifying refrigerant purity before system servicing
- UV Dye Kits: Fluorescent dye injection with UV light reveals elusive leaks
- Flush Adaptors: Quick-connect fittings enable efficient solvent application without damage
- Nitrogen Regulator Kits: Dry nitrogen pressure testing verifies integrity before charging
- Digital Thermometers: Measure vent temperatures for performance validation
- Electrical Diagnostics: Clamp meters and wiring diagrams for electrical component testing
5. Critical Safety Protocols
Working with AC systems requires strict adherence to safety protocols due to high pressures and regulated refrigerants:
- EPA Certification: Mandatory for technicians handling refrigerants in the United States
- Personal Protective Equipment: Safety goggles, gloves, and long sleeves prevent frostbite injuries
- Refrigerant Handling: Never vent refrigerants to atmosphere—recover using approved equipment
- Work Area Ventilation: Service in well-ventilated areas to prevent asphyxiation risks
- Container Safety: Never heat refrigerant containers or expose to open flames
- System Pressurization: Avoid using compressed air for pressure testing (oxygen + oil = explosion risk)
Professional shops maintain Material Safety Data Sheets for all chemicals and implement comprehensive training programs covering refrigerant handling, electrical safety, and emergency response procedures.
Step-by-Step Complete AC Repair Protocol
- System Evaluation: Perform initial performance test and visual inspection
- Refrigerant Recovery: Extract remaining refrigerant into approved recovery tank
- System Disassembly: Remove failed components (compressor, drier, expansion device)
- Containment Analysis: Inspect removed components for failure debris
- Component Flushing: Clean condenser, evaporator, and lines using approved flush kit
- Component Replacement: Install new compressor, accumulator/drier, and expansion device
- System Reassembly: Reconnect components with new O-rings lubricated with PAG oil
- Leak Testing: Pressurize with dry nitrogen to 150-200 PSI and verify integrity
- Deep Vacuum: Evacuate to 29+ inches Hg for minimum 45 minutes
- Recharge: Weigh in exact refrigerant quantity specified by manufacturer
- Performance Validation: Measure vent temperatures and system pressures
Tools & Resources for Professional Results
- Refrigerant Recovery Machines: EPA-compliant equipment for proper handling
- Electronic Scale: Precision measurement for accurate refrigerant charging
- Service Information: Manufacturer-specific repair procedures and specifications
- Tubing Tools: Flaring and bending equipment for line repairs
- Electrical Testers: Multimeters for diagnosing clutch circuits and sensors
Investing in professional-grade tools pays dividends through improved repair quality and reduced comebacks. While entry-level tools may seem economical initially, professional instruments offer greater accuracy, durability, and comprehensive capabilities essential for complete system restoration.
Frequently Asked Questions
Q: Can I perform AC repairs without a vacuum pump?
A: Absolutely not. Without proper evacuation, moisture remains in the system leading to acid formation, compressor damage, and premature failure. Vacuum evacuation is non-negotiable for professional repairs.
Q: How often should manifold gauge sets be calibrated?
A: Professional shops calibrate gauges annually or after 500 service hours. Inaccurate pressure readings lead to misdiagnosis and improper charging.
Q: What's the difference between single-stage and two-stage vacuum pumps?
A: Two-stage pumps create deeper vacuums (29-30 inches Hg vs 25-28 for single-stage) and achieve them faster due to more efficient air removal. They're essential for modern R-1234yf systems.
Q: Can I reuse refrigerant after recovery?
A: Only after processing through certified recycling equipment that restores purity to SAE J2099 standards. Direct reuse of recovered refrigerant is illegal and risks system contamination.
Q: Why must compressors be replaced after catastrophic failure?
A: Failed compressors distribute metallic debris throughout the system. Even after flushing, microscopic particles remain in the compressor housing, leading to immediate damage to replacement units.