

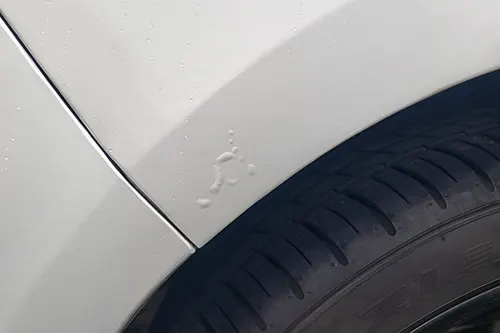
You walk up to your car after a weekend drive, and there it is – a small, ominous bubble under the paint near the wheel arch. It looks innocent enough, maybe the size of a pencil eraser. But beneath that raised, blister-like surface, something far more destructive is already at work: rust. For automotive enthusiasts who value both aesthetics and structural integrity, a paint bubble on a wheel arch is a red flag that demands immediate action. Ignoring it for even a few months can turn a simple DIY repair into a costly trip to the body shop – or worse, a rusted-through panel that compromises the vehicle's safety and resale value.
This comprehensive guide will walk you through why wheel arches are so vulnerable, how stone chips initiate hidden corrosion, and most importantly – what you can do early to stop the rust from spreading and save your car's bodywork.
Why Wheel Arches Are Rust Hotspots
The wheel arch is arguably the most abused area of any vehicle's exterior. It sits directly in the firing line of road spray, mud, salt, gravel, and small stones kicked up by your own tires. Unlike the hood or roof, the wheel arch also has a complex shape with sharp edges, folded metal seams, and often a double-layer construction where dirt and moisture can become trapped. In many cars, the inner wheel well is covered with a plastic liner, but that doesn't completely seal the outer arch. Over time, abrasion from road debris wears away the protective paint and primer, exposing bare metal.
But the real enemy is what you cannot see. A stone chip on the outer surface might seem trivial – a tiny dot where the paint has been knocked off. However, moisture, road salt, and oxygen immediately begin attacking that exposed steel. Because the chip is often smaller than a grain of rice, many owners overlook it or plan to "fix it later." Meanwhile, rust creeps laterally under the paint film, loosening adhesion and forming a blister. By the time the bubble appears, the corrosion underneath is already significantly larger than the visible bubble. What you see is literally the tip of the iceberg.
The Hidden Process: From Stone Chip to Paint Bubble
Understanding the corrosion mechanism helps you appreciate the urgency. Here's what happens step by step:
- Impact: A sharp stone or piece of road debris strikes the wheel arch at high speed, fracturing the clear coat and base paint layers. The metal may be slightly dented or simply exposed.
- Exposure: Water, oxygen, and electrolytes (road salt) reach the bare steel. An electrochemical reaction begins – iron converts to iron oxide, commonly known as rust.
- Underfilm Corrosion: Rust does not stay confined to the chip. It spreads sideways beneath the intact paint, following the metal surface. The rust product (iron oxide) occupies a larger volume than the original metal, creating pressure that pushes the paint upward.
- Blister Formation: Once the rusted area reaches a certain size, the paint loses adhesion and lifts, forming a bubble. At this point, the rust underneath is typically 3–5 times the diameter of the visible bubble.
- Perforation: If left untreated, rust eventually eats through the entire thickness of the steel, creating a hole. This is often terminal for the panel – repair requires cutting out the damaged section and welding new metal.
The speed of this process depends on climate. In wet, salt-heavy winter regions, a stone chip can lead to a visible bubble within 6–12 months. In dry climates, it might take two years, but the eventual outcome is the same if you do nothing.
Early Detection: How to Inspect Your Wheel Arches
Prevention starts with regular inspection. Make it a habit every time you wash your car or rotate your tires. Here's what to look for:
- Small dark specks – These could be stone chips that have already begun to rust. A rusting chip will appear as a tiny brown or orange dot.
- Paint discoloration – A yellowish or brownish halo around a chip indicates underfilm rust spreading.
- Any raised bump – Run your fingertip gently over the paint surface. A bubble feels smooth but slightly elevated, often with a hollow sound when tapped.
- Flaking or cracking – Paint that is starting to separate from the metal may show small cracks radiating from the chip.
- Inside edge of the arch – Don't forget to inspect the rolled lip inside the wheel well, where mud and moisture accumulate.
For a thorough check, use a bright LED flashlight and a magnifying glass. If you spot anything suspicious, move immediately to the repair phase – do not wait for the next oil change.
What to Do Early: A Step-by-Step DIY Repair (Before the Bubble Grows)
If you catch the problem when it's just a stone chip or a very small bubble (< 5mm diameter), you can perform an effective repair at home with basic tools. This will stop rust and restore protection. For larger bubbles (over 1cm or with flaking paint), professional intervention may be needed, but early small cases are perfect for DIY.
Tools and Materials You Will Need:
- Sandpaper (400, 800, 1500, 2000 grit) – waterproof variety
- Sandpaper block or soft sanding sponge
- Rust converter (phosphoric acid based) or rust remover gel
- Primer – self-etching primer for bare metal, then regular automotive primer
- Color-matched touch-up paint (get from dealer or specialized online store using your paint code)
- Clear coat (spray can or brush-on pen)
- Isopropyl alcohol or grease and wax remover
- Masking tape and plastic sheeting
- Fine-tip paintbrush or toothpick
- Microfiber cloths
- Optional: Dremel with small wire brush for heavy rust
Step 1 – Clean the Area Thoroughly
Wash the entire wheel arch and surrounding area with car shampoo to remove loose dirt. Then use isopropyl alcohol on a clean cloth to degrease the specific spot. Do not touch the cleaned surface with bare fingers – oils from your skin will prevent adhesion.
Step 2 – Remove the Paint Bubble and Rust
If there is a bubble, you must break it open. Use a sharp hobby knife or a fine pick to gently lift the edge of the bubble and peel away the loose paint. Do not enlarge the opening more than necessary. The goal is to expose all the rusted metal. For a stone chip without a bubble, simply sand the chip area lightly to remove any loose paint edges.
Using 400-grit sandpaper, carefully sand the rusted spot until you see shiny, clean metal. Extend the sanded area about 5–10mm beyond the visible rust. If there is deep pitting (tiny holes from corrosion), use a Dremel with a small wire brush or a rust remover gel. Follow the gel's instructions – typically apply, wait 15 minutes, then wipe off.
Step 3 – Apply Rust Converter
Even after sanding, microscopic rust particles may remain. Apply a thin layer of rust converter (e.g., Loctite Extend, Rust-Oleum Rust Reformer) to the sanded metal. This chemical transforms iron oxide into a stable, black primer-like layer. Let it dry completely (check product instructions, usually 1–2 hours).
Step 4 – Feather the Edges
Using 800 then 1500 grit sandpaper, feather the edges of the sanded area so that there is a smooth transition between the bare metal and the original paint. Wet-sand gently to avoid scratching the surrounding clear coat. The repaired area should feel completely smooth to your fingertip.
Step 5 – Prime the Area
Mask off a generous area around the repair (6 inches or more) to protect from overspray. Apply two thin coats of self-etching primer to the bare metal – this chemically bonds to steel. Then apply two coats of regular automotive primer over the entire sanded area. Allow each coat to dry as per manufacturer's recommendations. Lightly sand the primer with 1500-grit to eliminate orange peel.
Step 6 – Apply Base Coat (Color Paint)
Shake your touch-up paint well. For small repairs, use a fine-tip brush or even a toothpick to apply the paint in thin, multiple layers rather than one thick blob. Build up the color until it slightly exceeds the surrounding paint level (paint shrinks as it cures). Allow 10–15 minutes between coats. For larger areas, a spray can with a blending technique may be better, but for wheel arch chips, the brush method works well.
Step 7 – Apply Clear Coat
Once the base color is fully dry (at least 24 hours for some paints), apply clear coat. Use a fine brush or a clear coat pen. Apply 2–3 thin layers, extending slightly beyond the colored area to blend. The clear coat adds UV protection and gloss.
Step 8 – Sand and Polish (Optional but Recommended)
After 48 hours of curing, wet-sand the repaired area with 2000, then 2500, then 3000 grit sandpaper to level the clear coat with the surrounding paint. Use a polishing compound and a microfiber pad to restore shine. The result should be nearly invisible, especially on a wheel arch where reflections hide minor imperfections.
| Repair Step | Critical Tip | Common Mistake to Avoid |
|---|---|---|
| Cleaning | Use isopropyl alcohol, not water | Leaving wax or silicone on the surface |
| Rust removal | Sand until you see bare, shiny metal | Leaving any black specks – that's still rust |
| Primer | Self-etching primer is non-negotiable on bare metal | Skipping primer and painting directly on rust converter |
| Base coat | Multiple thin coats prevent runs | Applying one thick coat – it will crack |
| Clear coat | Extend slightly beyond color to blend | Not waiting for base coat to fully dry |
When the Bubble Is Already Large – Professional Help May Be Needed
If the paint bubble is larger than a dime (approx 1.5 cm) or if the paint is already cracked and falling off, the corrosion underneath has likely spread too far for a simple touch-up. In that case, the correct procedure involves:
- Grinding down to bare metal over a wide area
- Treating with rust neutralizer
- Applying body filler to restore the smooth contour (because rust has eaten away some metal thickness)
- Spraying primer, base, and clear over a larger blended area
This is best left to a professional auto body shop. However, even if you are taking it to a shop, you can apply a temporary protective coating (like a rust converter spray) to stop further spreading while you wait for the appointment.
Long-Term Prevention: How to Protect Wheel Arches from Future Rust
Once you've repaired the damage, you'll want to avoid repeating the cycle. Here are proven preventive measures:
- Install mud flaps or splash guards – These significantly reduce the amount of gravel and salt that strikes the wheel arch area.
- Apply paint protection film (PPF) – A clear self-healing film on the leading edge of the rear wheel arch (and the front bumper) absorbs stone impacts. It is virtually invisible and lasts for years.
- Use a rust-proofing spray inside the wheel well – Products like Fluid Film or Woolwax create a self-healing, waxy layer on the inner lip and seams. Reapply annually before winter.
- Frequent washing – During winter, wash your car every two weeks, paying special attention to wheel arches. Use a pressure washer to blast out accumulated mud and salt from behind the plastic liners.
- Inspect after every long trip – A quick visual check after a highway drive can catch new stone chips before they start rusting.
- Touch up chips immediately – Keep a bottle of color-matched touch-up paint in your glove box. The moment you spot a chip, clean and paint it. That single minute of work can save you from a bubble years later.
Cost Comparison: Early DIY vs. Delayed Repair
Let's look at real numbers to motivate early action (average US prices):
- DIY stone chip repair – $15–30 for sandpaper, primer, touch-up paint, clear coat. About 1 hour of your time.
- Small bubble (under 1 cm) professional repair – $150–300. The shop will sand, prime, and paint the area.
- Large bubble or rusted-through hole – $500–1,500 depending on the vehicle. May require welding a patch panel and painting the entire wheel arch or quarter panel.
- If rust spreads to the quarter panel seam – In some unibody cars, this can compromise structural integrity. Repair costs exceed $2,000, and resale value plummets.
The message is clear: investing 30 minutes and $20 at the stone chip stage saves hundreds or thousands later. It also preserves your car's appearance and structural health.
Real-World Example: How Neglect Turns a Pinprick into a Hole
Consider a 2015 sedan driven in the Midwest. In October, a small stone chips the rear wheel arch. The owner notices but decides to "fix it in spring." Over the winter, road salt and moisture work their way under the paint. By March, a 2 cm bubble has formed. The owner pokes it – the paint falls off, revealing a 4 cm rust patch with pitting. Now the repair requires sanding, filler, and blending. Cost: $400 at a shop. Had the owner applied touch-up paint in October, cost: $0 (they already had a bottle from a previous repair). This scenario plays out thousands of times every year.
Conclusion: Act Now – Your Wheel Arch Will Thank You
A paint bubble on a wheel arch is not a cosmetic flaw – it's a symptom of active corrosion that is eating your car from the outside in. The good news is that early detection and intervention are straightforward, inexpensive, and well within the capabilities of any motivated car enthusiast. By inspecting your wheel arches regularly, treating stone chips immediately, and performing the simple DIY repair steps outlined above, you can stop rust in its tracks and keep your vehicle looking sharp for years.
Remember: the best repair is the one you never need because you prevented the damage. But if you already see that small bubble, don't panic – just get to work this weekend. Your car's bodywork (and your future self) will thank you.
Drive smart, inspect often, and repair early.