

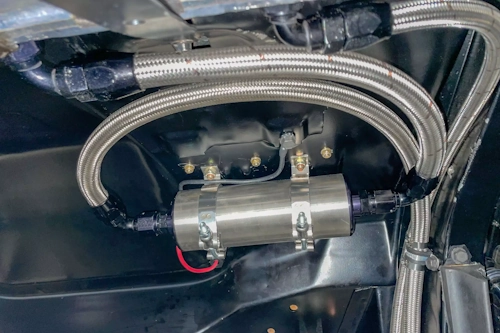
Boost Performance & Reliability with Proper Installation Techniques
Why Upgrade to an Electric Fuel Pump?
Electric fuel pumps represent a significant upgrade over mechanical counterparts, especially for performance applications and older vehicles. Unlike mechanical pumps that rely on engine operation to create suction, electric pumps use an integrated motor to push fuel from the tank to the engine at consistent pressure. This fundamental difference delivers several advantages: better fuel pressure regulation, reduced vapor lock susceptibility, and improved reliability, especially during cold starts or high-demand situations.
Pro Tip: The transformation in fuel delivery becomes apparent when dealing with modern ethanol-blended fuels, which have lower boiling points than traditional gasoline. Electric pumps mounted near the cooler fuel tank primarily push liquid fuel rather than pulling it, dramatically reducing vapor formation potential.
Video Tutorial
For visual guidance, watch this detailed installation tutorial:
Pre-Installation Planning and Component Selection
Choosing the Right Pump
Selecting the appropriate electric fuel pump requires understanding your engine's specific needs. Consider these factors when selecting your pump:
- Flow Rate Requirements: Calculate based on engine horsepower (rough estimate: Engine HP × 0.5 lb/hr ÷ 6)
- Pressure Specifications: Match to your carburetor or injection system requirements
- Voltage Compatibility: Ensure matching electrical system specifications
- Physical Configuration: Decide between in-tank and inline mounting options
Essential Tools and Components
Proper installation requires more than just the pump itself. You'll need:
- Fuel pump relay and appropriately sized fuse (never wire directly!)
- Oil pressure safety switch or inertia cutoff switch (critical safety components)
- SAE 30R7 fuel injection hose (rated for higher pressure applications)
- Quality fuel filters (pre-and post-pump recommended)
- Proper mounting hardware, fuel line disconnect tools, and wiring supplies
- Fire extinguisher and personal protective equipment
Safety First: Critical Precautions
Warning: Working with fuel systems demands respect for safety protocols. Gasoline vapors are highly flammable, and improper handling can lead to dangerous situations.
Before beginning installation, disconnect the negative battery terminal to prevent accidental sparks. Relieve fuel system pressure by removing the fuel pump fuse and running the engine until it stalls. Keep a fire extinguisher rated for gasoline fires readily accessible throughout the process.
Handle fuel carefully with appropriate containers and absorbent materials ready for spills. Wear safety goggles to protect your eyes from potential fuel spray and gloves to prevent skin irritation. Never smoke or allow ignition sources in the work area.
Step-by-Step Installation Guide
Phase 1: Preparation and Old Pump Removal
- Vehicle Preparation: Park on level ground, engage parking brake, and disconnect battery negative terminal
- Fuel System Depressurization: Locate and remove fuel pump fuse/relay, then crank engine briefly to relieve pressure
- Fuel Drainage: If necessary, safely drain some fuel from the tank to lower levels below pump mounting area
- Access Point Location: Most vehicles have fuel pump access through rear seat or trunk panel
- Old Pump Removal: Carefully disconnect electrical connections and fuel lines using appropriate disconnect tools
Phase 2: New Pump Installation
- Comparison and Preparation: Compare new pump with old unit to ensure compatibility
- Proper Mounting: Position the pump according to manufacturer specifications
- Fuel Line Connections: Use proper fuel line rated for pressure application
- Electrical Connections: Wire through relay system rather than direct connection
Phase 3: Safety System Integration
The most critical aspect often overlooked by DIY installers is proper safety system integration. An electric fuel pump must include safety cutoffs to prevent continuous fuel flow in case of accident or engine failure.
- Oil Pressure Safety Switch: Install into engine oil gallery port
- Inertia Safety Switch: Recommended addition that cuts power during impact situations
- Proper Relay Wiring: Use a standard Bosch-type relay triggered by ignition circuit
Phase 4: System Testing and Verification
- Pre-Start Check: Double-check all connections for security and proper routing
- Electrical Test: Reconnect battery and turn key to "on" position without starting
- Leak Inspection: Carefully check all connections for seepage or dripping
- Pressure Verification: If possible, connect fuel pressure gauge
- Initial Start: Start engine and observe operation at idle
- Test Drive: After successful stationary testing, conduct careful road test
Troubleshooting Common Installation Issues
Even with careful installation, issues can occasionally arise. Here's how to diagnose and resolve common problems:
- Pump Doesn't Prime: Check power at pump connections with multimeter
- Fuel Leaks: Immediately address any seepage
- Engine Sputtering: May indicate air in lines—cycle ignition multiple times to purge
- Unusual Noise: Often caused by improper mounting orientation or vibration
- Pressure Irregularities: Check for restrictions in lines or filters
Performance Benefits and Applications
The investment in a proper electric fuel pump installation delivers multiple benefits across different applications:
For Classic and Carbureted Vehicles
- Eliminates vapor lock issues
- Provides instant priming after extended parking
- Ensures consistent fuel delivery
For Performance Applications
- Supports increased horsepower demands
- Maintains pressure stability during high-RPM operation
- Allows flexible mounting options
For Daily Drivers
- Improves cold start reliability
- Enhances fuel economy
- Increases overall system reliability
Maintenance and Long-Term Reliability
Proper installation is only the beginning—regular maintenance ensures long-term reliability. Inspect your electric fuel pump annually for signs of wear, corrosion, or leakage. Replace fuel filters according to manufacturer recommendations (typically every 10,000 miles) to prevent premature pump failure.
Listen for changes in pump operation sound—increasing whine or grinding may indicate impending failure. Monitor engine performance for signs of fuel delivery issues, especially under high load conditions. Keep electrical connections clean and protected from moisture.
Conclusion: Empowering Your Automotive Journey
Installing an electric fuel pump represents more than just a repair—it's an upgrade that enhances your vehicle's reliability, performance, and safety. By following this comprehensive guide, you've not only improved your vehicle's operation but also gained valuable insight into fuel system fundamentals.
The satisfaction of completing this complex installation extends beyond the immediate performance benefits. Each time your engine starts promptly and runs smoothly, you'll appreciate the effort invested in this project. The knowledge gained empowers you to tackle future automotive challenges with confidence.
Remember that while DIY projects offer great satisfaction, there's no shame in consulting professionals when faced with uncertainties. Your safety and your vehicle's reliability are paramount. With your new electric fuel pump properly installed, you're ready for many miles of trouble-free driving.
Note: This guide provides general installation information. Always consult vehicle-specific documentation and consider professional assistance if unsure about any aspect of the installation process.