

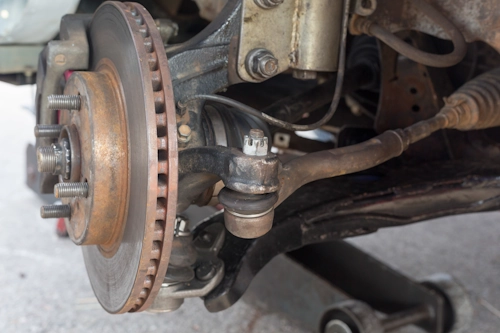
As steering system sentinels, tie rod ends form the critical connection between your steering rack and wheels. When these $30-$80 components wear out, they compromise vehicle control and create dangerous driving conditions. This comprehensive guide distills three decades of suspension experience into a professional yet accessible walkthrough for DIY enthusiasts ready to tackle outer tie rod replacement.
Recognizing the Death Rattle: Symptoms of Failed Tie Rod Ends
Diagnosing outer tie rod failure requires both observational and physical testing techniques. Watch for these telltale symptoms:
- Steering wheel free play: More than 1-2 inches of side-to-side movement while driving straight indicates excessive wear
- Uneven tire shoulder wear: The "sawtooth" scalloping pattern appears when wheels can't maintain proper alignment angles
- Steering wheel vibration: Particularly noticeable during low-speed turns when component stress peaks
- Audible warning signs: Distinct metallic clicking or chuckling sounds when turning over bumps signal joint play
- Vehicle pulling: While often alignment-related, persistent pull after alignment suggests component failure
Pro Diagnostic Technique: With vehicle safely raised and wheels off the ground, place hands at 9 and 3 o'clock positions. Quickly shake the wheel left-right. Any clunking or knocking indicates tie rod play. Confirm by having an assistant observe the tie rod while performing this test - visible movement at the joint confirms failure.
The Professional Tool Arsenal
Essential Hand Tools- Breaker bar & socket set
- Combination wrench set
- Torque wrench (1/2" drive)
- Needle-nose pliers
- Channel lock pliers
- Tie rod end puller/separator
- Ball joint separator fork
- Penetrating oil (PB Blaster)
- Steel wire brush
- ANSI-approved safety glasses
- Mechanic's gloves
- 3-ton jack stands
- Wheel chocks
- Fire extinguisher (if using heat)
Critical Safety Notice: Never work under a vehicle supported only by a hydraulic jack. Steering components store significant spring energy - support knuckles properly before disassembly. When using heat near rubber components, have a fire extinguisher immediately accessible.
Replacement Procedure: A Methodical Approach
Pre-Service Preparation
Park on level concrete, engage parking brake firmly, and chock rear wheels. Before lifting:
- Mark jam nut position with paint or scribe line
- Measure exposed inner tie rod threads
- Photograph assembly from multiple angles
- Count turns during disassembly (critical for alignment preservation)
Disassembly Sequence
- Loosen lug nuts slightly before lifting vehicle
- Raise vehicle using manufacturer-specified jack points
- Secure on jack stands and remove wheel
- Apply penetrating oil to jam nut and castle nut (allow 15-minute soak)
- Straighten/remove cotter pin from castle nut using needle-nose pliers
- Remove castle nut while supporting tie rod end shaft
- Position puller tool between knuckle and tie rod end
- Tighten puller gradually until joint releases (avoid hammer impacts)
- Hold inner tie rod stationary with backup wrench
- Count turns while unscrewing outer tie rod end
Installation Protocol
- Conduct old/new part comparison: length, taper angle, thread pitch
- Thread new outer tie rod onto inner rod exactly the counted turns
- Position jam nut at original marked location
- Insert tie rod stud through steering knuckle
- Hand-start new castle nut (ensure taper seats completely)
- Apply manufacturer-specified torque to castle nut Typical Torque Values:
- Passenger cars: 35-50 ft-lbs
- Light trucks: 45-60 ft-lbs
- Always verify specific requirements
- Install new cotter pin (never reuse old pin)
- Tighten jam nut against outer tie rod end
- Grease fittings (if equipped) until boots slightly expand
- Reinstall wheel and lower vehicle gradually
The Critical Post-Installation Protocol
Your work isn't complete when the last bolt is tightened. These steps determine long-term success:
| Step | Procedure | Purpose |
|---|---|---|
| Initial Test Drive | Drive under 35mph on empty road. Perform gentle S-turns | Verify no binding or unusual noises |
| Steering Angle Reset | Turn wheel lock-to-lock 3 times with engine running | Reinitialize electronic stability systems |
| Alignment Priority | Schedule alignment before 50 miles of driving | Prevent tire damage from incorrect toe angle |
| 100-Mile Recheck | Retorque all fasteners after initial driving | Account for component settling |
Choosing Components Wisely: The Longevity Factor
Not all tie rods endure equally. Consider these construction features when selecting replacements:
- Ball stud design: OEM-style cold-forged studs outperform hot-forged aftermarket alternatives
- Sealing technology: Triple-lip seals with dust boots prevent premature contamination failure
- Corrosion protection: Electrocoated or zinc-plated bodies resist salt damage
- Boot material: Thermoplastic polyurethane (TPU) outperforms standard rubber
- Grease quality: Molybdenum disulfide-based lubricants maintain viscosity across temperature extremes
Professional Insights From the Front Lines
Through decades of suspension work, I've compiled these field-tested recommendations:
- Penetrating oil protocol: Apply daily for three days before working on rust-prone vehicles
- The double-nut trick: When threads are damaged, use two jam nuts locked together to clean threads
- Boot protection Wrap boots with aluminum foil when using heat near joints
- Torque verification Recheck all fasteners after 100 miles and seasonally thereafter
- Preventive maintenance Inspect tie rods during every oil change - look for torn boots and play
Mastering tie rod replacement transforms how your vehicle connects with the road. That precise, confident steering feel returning to your hands represents automotive satisfaction money can't buy. While the process demands methodical precision, the safety and handling rewards justify every careful turn of the wrench. Remember - suspension work isn't about parts replacement; it's about restoring conversations between driver, machine, and pavement.