

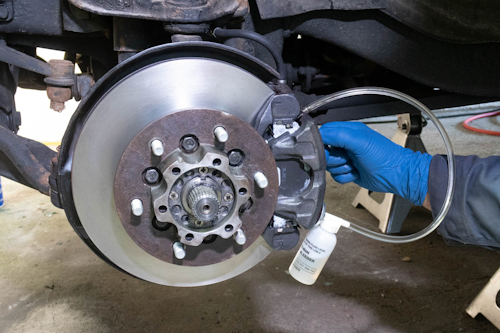
Bleeding the brakes is one of the most important maintenance procedures in any vehicle. It ensures that your braking system is free of air bubbles and filled with fresh brake fluid, providing optimal stopping power. Whether you’re working in a professional garage or at home, knowing how to properly bleed your brakes — manually or with a pressure device — will keep your vehicle safe and responsive.
Why Brake Bleeding Is Necessary
Brake fluid transfers force from the pedal to the brake calipers. However, over time, moisture can enter the hydraulic system, reducing boiling point and causing internal corrosion. More critically, air can become trapped inside the lines. Since air is compressible, even small pockets can make your pedal feel spongy and increase braking distance. Bleeding removes this air and replaces old fluid with clean, moisture-free fluid.
Types of Brake Bleeding
There are two primary methods for bleeding brakes:
- Manual Bleeding – Performed by two people: one pumps the brake pedal, while the other opens and closes the bleeder valve to release fluid and air.
- Pressure (or Vacuum) Bleeding – Uses a pressurized device or vacuum pump to push or pull fluid through the system, often done by one person.
Each method has its advantages. Manual bleeding is inexpensive and reliable for small jobs, while pressure bleeding is faster and ideal for modern vehicles with ABS systems or when working alone.
Tools and Materials You’ll Need
- New brake fluid (check your owner’s manual for the correct DOT rating)
- A wrench to fit the bleeder valves
- A clear plastic tube and a container for old fluid
- Jack and jack stands or a lift
- Protective gloves and safety glasses
- Rags or shop towels
- (Optional) Pressure or vacuum brake bleeder kit
Step-by-Step: Manual Brake Bleeding
Step 1: Preparation
Ensure the car is parked on a flat surface. Engage the parking brake and open the hood. Remove the brake fluid reservoir cap and top up the fluid to the maximum mark. Brake systems typically require DOT 3, DOT 4, or DOT 5.1 fluid — never mix different types unless specified by the manufacturer.
Step 2: Identify the Bleeding Sequence
The correct order is usually the wheel farthest from the master cylinder first, and the closest last. For left-hand drive vehicles, this sequence is typically:
- Right rear
- Left rear
- Right front
- Left front
However, always confirm the order in your vehicle’s service manual, especially if it has a diagonal split braking system.
Step 3: Attach the Clear Tube
Fit one end of the tube onto the bleeder valve and submerge the other end in a small container with some fresh brake fluid. This prevents air from being sucked back into the system.
Step 4: Pump and Release
Ask your assistant to press the brake pedal several times and hold it down. While the pedal is held, open the bleeder valve slightly. Fluid — often dark and bubbly — will flow into the tube. Once the flow slows down, close the valve tightly and instruct your assistant to release the pedal.
Repeat this process 4–5 times per wheel, keeping an eye on the reservoir level. Never let the reservoir run dry, or air will re-enter the system.
Step 5: Refill and Check
After finishing all wheels, refill the reservoir to the MAX line. Pump the brake pedal several times — it should feel firm and consistent. Check for leaks around all bleeder valves and fittings.
Step-by-Step: Pressure or Vacuum Bleeding
Step 1: Set Up the Pressure Bleeder
Attach the bleeder cap securely to the master cylinder reservoir. Pressurize the unit according to the instructions (usually around 1.5–2 bar or 20–30 psi). Ensure the device is filled with new brake fluid.
Step 2: Bleed Each Wheel
Open the bleeder valve on the first wheel while the system is pressurized. Fluid should flow steadily through the tube without bubbles. Once it runs clear, close the valve and move to the next wheel. This method eliminates the need for a second person and provides a more uniform flow.
Step 3: Final Inspection
Once all wheels are done, release the pressure, remove the bleeder, and check the fluid level. Clean up any spilled fluid immediately, as brake fluid can damage paint and rubber components.
Common Mistakes to Avoid
- Letting the reservoir run dry: This reintroduces air into the system, undoing all your work.
- Using the wrong fluid type: Mixing DOT 3 and DOT 5 (silicone-based) can cause seal failure.
- Over-tightening the bleeder valves: This can strip threads or crack the caliper housing.
- Skipping the correct bleeding order: Results in uneven pressure and trapped air.
- Reusing contaminated fluid: Old or dirty fluid shortens the lifespan of seals and components.
Additional Tips
It’s recommended to bleed your brakes every 2 years or 40,000 km, even if you don’t notice symptoms. If your car is equipped with ABS, refer to the manufacturer’s instructions — some systems require a diagnostic tool to activate the ABS pump during bleeding. Always dispose of used brake fluid properly, as it’s toxic and not recyclable.
When to Seek Professional Help
If your brake pedal remains soft after several rounds of bleeding, or if you hear hissing and fluid loss near the master cylinder, it’s time to visit a certified mechanic. Persistent air in the system may indicate a damaged line, leaking caliper, or internal master cylinder failure.
Conclusion
Proper brake bleeding restores safety and confidence on the road. Whether you prefer the traditional manual method or the convenience of a pressure bleeder, attention to detail is essential. By following this guide and avoiding common mistakes, you ensure consistent braking performance and extend the life of your braking components. Remember — in the world of vehicle maintenance, few systems are as critical as the one that stops your car.