

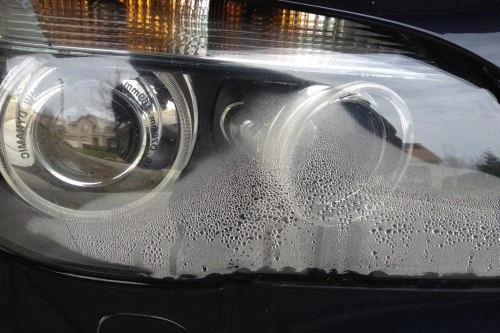
That murky haze inside your headlights isn't just an eyesore - it's a safety hazard threatening to dim your nighttime visibility and compromise your vehicle's inspection readiness. Moisture trapped within headlight assemblies creates dangerous blind spots while driving after dark and accelerates corrosion of electrical components. Understanding why condensation forms and how to eliminate it permanently separates temporary fixes from lasting solutions that keep your illumination crystal clear.
Why Moisture Invades Your Headlight Sanctuary
Three primary culprits allow moisture to penetrate headlight assemblies:
- Blocked Ventilation Systems: Modern headlights incorporate vents that manage air pressure fluctuations caused by heating (during operation) and cooling (when turned off). When these vents become obstructed by road debris, spider webs, or dirt, trapped humidity condenses into visible droplets.
- Failed Seals and Gaskets: Rubber or foam seals around bulbs and between lens-housing junctions degrade over time. Even microscopic gaps allow moisture ingress during rainstorms or car washes.
- Physical Damage: Cracked lenses or fractured housing from road debris impact create direct pathways for water intrusion. These often require full assembly replacement for proper resolution.
Condensation becomes problematic when it persists beyond 24-48 hours or forms large water droplets. While minor morning mist may evaporate naturally when headlights heat during operation, pooling water indicates serious sealing failures needing intervention.
Emergency Moisture Extraction Without Disassembly
Try these non-invasive techniques first for moderate condensation before resorting to seal-breaking procedures:
| Method | Procedure | Duration | Precautions |
|---|---|---|---|
| Silica Gel Absorption | Place 3-4 silica packets near bulb access points inside engine bay | 24-48 hours | Remove packets before driving to prevent fire risk |
| Compressed Air Flushing | Blow air through vent tubes from 6+ inches away | 15-minute cycles | Use low pressure to avoid damaging seals |
| Hairdryer Evaporation | Apply low heat moving constantly across lens | 10-15 minutes | Maintain 12-inch distance to prevent melting |
| Rice/Desiccant Pouches | Secure fabric bags of rice or clay cat litter near assembly | Overnight | Use breathable fabric to contain particles |
| Automotive Dehumidifier | Park vehicle in enclosed space with dehumidifier running | 8-12 hours | Position unit level with headlights |
For the silica gel method, position packets near bulb access points or vent tubes (accessible from the engine bay without removing the assembly). The hygroscopic material actively pulls moisture vapor from enclosed spaces, significantly reducing fogging within 24 hours. Combine with 10-minute hairdryer sessions accelerating evaporation for stubborn cases.
Permanent Solutions for Chronic Condensation
When temporary methods provide only fleeting relief, these repairs address root causes:
Ventilation Rehabilitation
- Locate vent tubes (consult service manual for positions)
- Remove debris using compressed air or soft brush
- Test drainage by pouring water through vents
- Apply silicone spray to rubber vent flaps preventing sticking
Seal Renewal Procedure
- Remove headlight assembly per vehicle instructions
- Extract bulbs and store on lint-free cloth
- Inspect bulb gaskets for cracks - replace if hardened
- Apply butyl rubber sealant around lens-housing junction
- Reinstall assembly ensuring even bracket seating
For damaged assemblies, weigh repair costs against replacement. Aftermarket housings for common models often cost $100-$400, while luxury vehicles may exceed $1,000 per unit. Resealing makes financial sense when housings are structurally sound.
Proactive Defense Against Foggy Relapses
- Annual Vent Maintenance: Clear vent tubes each bulb replacement cycle using pipe cleaners or low-pressure air
- Seal Inspections: Check lens seals after car washes using flashlight beam - moisture trails indicate failures
- Protective Films: Apply UV-resistant laminates preventing lens microcracks that trap moisture
- Garage Parking: Reduce humidity exposure during high-dew-point seasons
When to Seek Professional Reinforcement
Despite your best efforts, certain scenarios demand expert intervention:
- Water pooling in lower housing sections
- Visible algae/mold growth inside lenses
- Electrical malfunctions (flickering bulbs, intermittent operation)
- Persistent fogging after resealing attempts
Automotive lighting specialists possess vacuum-sealing equipment and leak-testing chambers that diagnose elusive failure points. For vintage or luxury vehicles, professional restoration often proves cheaper than replacement assemblies.
Illuminating the Path Forward
Moisture-filled headlights represent more than cosmetic flaws - they're early warnings of compromised safety systems. While temporary drying techniques restore short-term visibility, permanent solutions demand thorough sealing rehabilitation and ventilation maintenance. Remember that minor condensation often self-resolves during normal operation, but persistent droplets signal necessary repairs. With these proven techniques, you'll transform fog-bound headlights into luminous beacons ensuring safer journeys through darkest nights.