

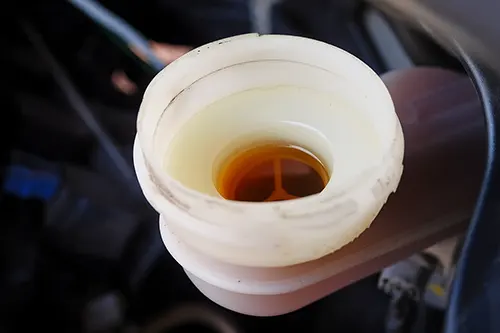
Fresh brake fluid is virtually clear or carries a light amber/golden hue, depending on the glycol-based formulation (DOT 3, DOT 4, or DOT 5.1). Yet many drivers notice that only months after a flush, the fluid in the reservoir turns a dark brown, almost black color. This rapid darkening isn't just an aesthetic issue—it's a red flag that your brake system's health may be compromised. The three prime suspects are moisture ingress, rubber debris from aging seals and hoses, and contamination from a dirty or deteriorating reservoir. In this deep-dive guide, we’ll dissect each cause, explain how they accelerate fluid degradation, and provide actionable steps to keep your braking system safe and responsive.
Why Brake Fluid Color Matters More Than You Think
Brake fluid is a hydraulic fluid designed to operate under extreme pressure and temperature. Unlike engine oil, it doesn't burn or get "used up" in combustion, but it is highly susceptible to chemical and physical contamination. Dark fluid indicates:
- Loss of critical properties – high boiling point, corrosion inhibition, and lubricity.
- Increased risk of brake fade – water in the fluid boils at a much lower temperature, creating vapor pockets that compress instead of transmitting hydraulic force.
- Internal corrosion – acidic byproducts attack caliper pistons, wheel cylinders, and the ABS modulator.
- Premature seal failure – swollen, softened, or eroded rubber components lead to leaks and pedal feel deterioration.
Understanding why your fluid darkens rapidly is the first step toward preventing expensive brake repairs. Let's examine the three main offenders in detail.
1. Moisture Absorption – The Silent Performance Killer
Glycol-based brake fluids are hygroscopic by design. This means they actively absorb moisture from the atmosphere through the reservoir vent, microscopic pores in rubber hoses, and even past seals. While this property helps prevent free water from pooling and freezing in the lines, it also leads to:
- Reduced boiling point – Fresh DOT 4 fluid has a dry boiling point of ~230°C (446°F). With just 3.7% water content, the wet boiling point can drop below 165°C (329°F) – a catastrophic loss for performance or mountain driving.
- Darkening via oxidation – Moisture promotes oxidation of the fluid's additive package and corrosion of metal surfaces (iron, steel, copper), producing dark, suspended particles.
- Acid formation – Water reacts with borate esters and other additives, lowering pH and accelerating internal rust.
How to spot moisture-related darkening: The fluid often turns a milky brown or dark tea color, and a moisture test strip or electronic brake fluid tester will show >2% water content. If you live in a humid climate or frequently drive with a partially open reservoir cap, moisture accumulation can darken new fluid in as little as six months.
2. Rubber Debris – Deteriorating Seals, Hoses, and Cup Expanders
Modern brake systems contain various rubber components: master cylinder primary/secondary cups, caliper piston seals, wheel cylinder boots, and flexible hoses lined with synthetic rubber (EPDM). Over time, these parts degrade due to:
- Heat cycling – Brake fluid temperatures can exceed 150°C (302°F) under heavy use, hardening rubber and causing micro-cracking.
- Chemical attack – Contaminated fluid (especially with copper or iron particles) accelerates rubber breakdown.
- Age – Most rubber brake components have a service life of 6–10 years. After that, they shed tiny black particles that turn the fluid dark and gritty.
When rubber debris enters the fluid, it appears as fine black specks suspended in a dark liquid – sometimes with a slightly thicker consistency. This is a clear sign that hoses or seals are disintegrating. The most common culprits are old flexible brake hoses whose inner liners have collapsed, and master cylinder seals that have been worn by contaminated fluid. Replacing the fluid alone won't solve this; you must identify and replace the degrading rubber component.
3. Old Reservoir Contamination – The Overlooked Source
The brake fluid reservoir is often made of translucent plastic (polypropylene). Over years of heat and UV exposure, the plastic can:
- Develop internal cracks that trap old, burned fluid residue.
- Release plasticizers or degraded polymer particles into fresh fluid.
- Accumulate sludge from previous fluid that wasn't fully flushed – especially if the reservoir was never removed and cleaned.
Even a perfect system flush can fail if you simply drain the old fluid from the bleeders but leave the reservoir in place. Residual sludge, crystallized additives, or brake dust that entered through the cap can instantly darken new fluid. In severe cases, the reservoir itself becomes porous and leaches dark pigments. The solution: either replace the reservoir (many are inexpensive and sold separately) or thoroughly scrub it with denatured alcohol and a small brush, then dry with filtered compressed air.
Comparative Table: Identifying the True Culprit
| Characteristic | Moisture Contamination | Rubber Debris | Reservoir Contamination |
|---|---|---|---|
| Fluid appearance | Milky brown, translucent but dark | Opaque black with visible particles | Dark with sludge-like sediment, may have colored streaks |
| Test results | Boiling point low, moisture >2%, copper strip test positive | Particle count high, rubber smell, fluid may feel sticky | New fluid darkens within days without driving |
| Primary cause | High humidity, loose cap, never flushed for years | Aged hoses (>8 years), worn caliper seals | Old reservoir not cleaned or replaced during flush |
| Solution | Complete flush with high-quality fluid, check cap seal | Replace all rubber hoses and suspect seals, then flush | Remove reservoir, clean or replace, then full flush |
How to Diagnose the Root Cause in Your Own Garage
Before you spend money on parts, perform these simple checks:
- Visual & smell test – Dip a clean white paper towel into the reservoir. Dark brown fluid that smells like burnt oil points to heat degradation and rubber. A musty or slightly sweet smell combined with a lighter brown suggests moisture.
- Moisture meter – An electronic brake fluid tester (under $20) gives a percentage reading. Anything above 2% means moisture is the main driver. If it’s below 2% but the fluid is black, rubber or reservoir contamination is likely.
- Check the reservoir walls – Shine a flashlight through the plastic. If you see black streaks, peeling inner coating, or a thick layer of sludge at the bottom, the reservoir is the source.
- Inspect flexible hoses – Squeeze the rubber brake hoses. If they feel rock hard, have visible cracks, or show bulges, they are shedding internal debris.
- Bleed a small amount from each caliper – Catch the fluid in a clear jar. If the fluid from the calipers is much darker than the reservoir fluid, the contamination is happening downstream (rubber hoses or caliper seals). If all fluid is uniformly dark, the problem is universal – moisture or reservoir sludge.
The Domino Effect: Why Ignoring Dark Fluid Leads to Expensive Repairs
Many drivers postpone a brake fluid flush because "the brakes still work." But dark fluid doesn't just stay dark – it actively destroys the system:
- Moisture-laden fluid corrodes the inside of steel brake lines, leading to pinhole leaks and sudden loss of pressure.
- Rubber particles clog the tiny orifices in the ABS hydraulic unit. An ABS repair can cost $1,500–$2,500.
- Acidic fluid eats through the chrome surface of caliper pistons, causing them to stick and wear pads unevenly.
- Sludge accumulation in the master cylinder can block the compensation ports, causing brake drag and overheating rotors.
A simple brake fluid flush every 2–3 years (or as recommended by your vehicle manufacturer) costs $80–$150 at a shop or $20–$40 in DIY materials. Compare that to a full brake system overhaul that easily exceeds $1,000. The economics are clear.
Preventive Measures & Best Practices
To keep your brake fluid clean and clear for as long as possible, adopt these habits:
- Flush religiously – Every 24 months or 30,000 miles, regardless of color. Use a pressure bleeder or two-person method to exchange all old fluid.
- Always keep the reservoir cap tightly sealed – Never leave it off longer than necessary. Replace the cap if the rubber diaphragm is torn.
- Use fresh, sealed brake fluid containers – Fluid absorbs moisture even before it goes into the car. Discard any bottle that has been open for more than a month.
- Replace rubber hoses proactively – At 8–10 years of age, even if they look fine externally, the inner liner can degrade. This is a cheap (typically $15–40 per hose) and easy DIY job.
- Clean or replace the reservoir when flushing – Many professional technicians remove the reservoir, dump the sludge, and blast it clean with brake cleaner or isopropyl alcohol. For under $30, a new reservoir is even better.
- Consider DOT 5.1 for high-humidity regions – It has a higher wet boiling point than DOT 4 and absorbs moisture more slowly, though it still requires regular changes.
When Is Dark Fluid Actually Normal?
There are a few scenarios where dark fluid may not indicate an emergency, though it still warrants monitoring:
- High-performance/racing applications – Track-driven cars see extremely high caliper temperatures that can naturally darken fluid within one weekend. In this case, flushing after every race event is standard.
- Very old vehicles (pre-1980s) – Some classic cars used natural rubber seals that would inevitably turn the fluid dark over time. Upgrading to modern EPDM seals and flushing is still recommended.
- After a recent flush with DOT 3 – DOT 3 ages faster than DOT 4 or 5.1. If you flushed with DOT 3 in a humid environment, a light amber-to-brown shift in 12 months is possible but should still prompt a moisture test.
Bottom line: If your brake fluid is darker than strong tea, schedule a flush. If it's black like used motor oil, do not drive the car until you've diagnosed and repaired the root cause.
Step-by-Step DIY: How to Perform a Complete Brake Fluid Renewal That Lasts
For enthusiasts who prefer to do the job themselves, follow this protocol to address all three contamination sources:
- Safety first – Wear gloves and safety glasses. Brake fluid is corrosive to paint and skin.
- Remove the reservoir – Unbolt it from the master cylinder (some are integrated; if integrated, skip to step 4). Pour out old fluid and scrub the inside with a bottle brush and isopropyl alcohol. Rinse with new brake fluid (never water).
- Inspect master cylinder bore – Look for scoring or rust. If present, replace the master cylinder.
- Replace all flexible brake hoses – If they are over 8 years old or show any signs of cracking. Use copper crush washers where applicable and torque to spec.
- Pressure bleed the entire system – Starting from the farthest wheel (right rear) to the closest (left front). Use 2–3 quarts of fresh fluid to ensure complete exchange.
- Test drive and re-bleed – After a short drive, re-check pedal feel and top off the reservoir.
- Dispose of old fluid properly – Take it to an auto parts store or recycling center. Never pour it down drains or on the ground.
Conclusion: Clear Fluid, Confident Stops
Dark brake fluid is not a cosmetic annoyance—it's a diagnostic window into the health of your entire braking system. Moisture, rubber debris, and a contaminated reservoir each leave unique fingerprints, but all three demand swift action. By understanding the causes and performing regular, thorough flushes with high-quality fluid, you'll preserve boiling point margins, protect expensive ABS components, and maintain the pedal feel that makes driving enjoyable and safe. Next time you pop the hood and see that the brake fluid has turned dark far too quickly, don't just top it off—dig deeper, replace what's worn, and flush until the fluid runs as clear as your commitment to automotive excellence.
Remember: Brakes don't give second chances. When in doubt, flush it out. Your life and the lives of your passengers depend on that amber-tinted hydraulic fluid being in peak condition.