

Flex Joint Leak Confirmation: A Comprehensive Diagnostic Guide for the Home Mechanic
Let's be honest: few things are as frustrating as an exhaust leak. That persistent ticking that accelerates with engine speed, the subtle (or not-so-subtle) drone inside the cabin, or the smell of exhaust fumes creeping into the ventilation—it all points to a failure in the system. Often, the culprit is a component designed for flexibility: the flex joint.
Flex joints, also known as flexible couplings or decouplers, are essential components in modern exhaust systems. Positioned between the engine and the catalytic converter, their job is to absorb the constant movement and vibration of the engine, preventing stress cracks from forming on the rigid exhaust pipes and manifolds. However, this constant flexing and exposure to extreme heat, road salt, and moisture make them a common failure point. A failed flex joint isn't just a noise nuisance; it can lead to dangerous carbon monoxide entering the passenger compartment and negatively impact engine performance and fuel economy by disrupting the oxygen sensor readings.
In this guide, we’ll walk through the systematic process of confirming a flex joint leak. We’ll cover the essential tools, the step-by-step inspection techniques, and how to verify your diagnosis so you can repair with confidence.
Understanding the Flex Joint's Anatomy and Failure Modes
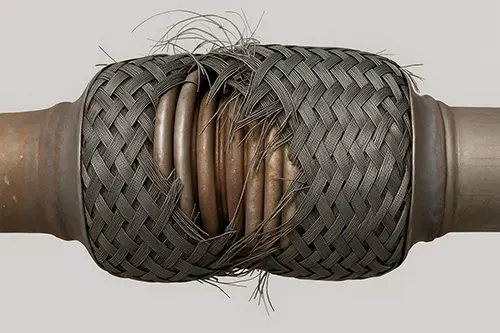
Before we grab tools, it helps to understand what we're looking at. A typical flex joint consists of a short section of corrugated, flexible stainless steel tubing, often covered by a protective outer braid (also stainless steel) and sometimes a heat shield. This braid protects the inner corrugated tube from road debris while allowing it to bend.
Failure typically occurs in one of three ways:
- Mechanical Fatigue: The inner corrugated tube cracks due to millions of flex cycles, especially if the engine/transmission mounts are worn, causing excessive movement.
- Corrosion: In regions with harsh winters, road salt eats away at the stainless steel, causing pinhole leaks or complete disintegration of the braid and inner pipe.
- Physical Damage: Striking a curb, speed bump, or large road debris can crush or tear the joint.
Essential Tools for Diagnosis
Diagnosing a flex joint leak doesn't require a fully stocked professional garage, but having the right tools makes the job safer, faster, and more accurate. Here’s what you’ll need:
- Safety First: Safety glasses, mechanic’s gloves (the exhaust gets hot!), and a disposable respirator or dust mask (to avoid inhaling rust particles).
- Light Source: A high-powered LED work light or a sturdy inspection flashlight.
- Inspection Mirror: A telescoping mechanic's mirror with a swivel head is invaluable for seeing the top side of the flex joint, which is often hidden by heat shields or subframe members.
- Floor Jack and Jack Stands: To safely raise and support the vehicle for an undercarriage inspection. Never rely on a jack alone.
- Optional but Highly Recommended Tools:
- Rubber Mallet or Dead-Blow Hammer: Used to gently tap the exhaust and listen for changes in the leak sound.
- Propane Torch (Unlit): A safe and effective way to introduce a small, flammable gas stream into a suspected leak area. The engine's idle will change if the gas is sucked into the exhaust stream.
- Smoke Machine: If you have access to an automotive smoke machine, this is the gold standard for pinpointing the smallest exhaust leaks.
- Shop Vacuum (on 'Blow' mode) and Rags: For creating a rudimentary pressure test.
Step-by-Step Flex Joint Leak Confirmation
Let's move from a general suspicion to a confirmed diagnosis. Follow these steps in order.
Step 1: The Cold Start and Listen Test
Start your diagnostic process with the engine cold. A cold engine often makes exhaust leaks more noticeable for two reasons: the metal components are contracted, potentially opening gaps slightly, and the initial rich fuel mixture creates higher exhaust pressure.
- Start the engine and listen carefully near the front of the vehicle, specifically in the area between the engine and the catalytic converter.
- A flex joint leak often produces a distinct "ticking" or "puffing" sound that is synchronized with the exhaust pulses. It’s a sharper, more metallic sound than a typical manifold gasket leak.
- Have an assistant gently rev the engine while you listen. The ticking should increase in speed and volume with engine RPM.
- Location Clue: Crouch near the passenger side front wheel well. Flex joints are often located directly below or slightly behind the exhaust manifold, easily accessible from this position.
Step 2: Safe Vehicle Lift and Visual Inspection
With the engine off and cooled (if you've already run it), safely lift the vehicle. Position the jack stands under the manufacturer-recommended lift points.
- Once the vehicle is secure, grab your light and inspection mirror.
- Visual Check: Look at the flex joint. Is the outer braid frayed, rusted through, or completely gone? Can you see dark soot or "exhaust tattoo" (black carbon marks) radiating from a specific spot on the joint? Soot is a dead giveaway of an active leak.
- Physical Check: Gently grab the exhaust pipe on either side of the flex joint and try to move it up and down and side-to-side. There should be a small amount of rotational and lateral movement, but it should feel firm. If it feels floppy, clunks, or you can see the corrugated inner liner visibly torn, the joint is shot.
- Check the condition of the engine and transmission mounts. If you can easily move the engine with a pry bar (carefully!), the excessive movement will destroy a new flex joint in no time.
Step 3: The Dynamic Flex Test (The "Rock and Listen")
This test helps confirm if the noise you hear is coming from the flex joint.
- With the engine running (and the vehicle securely on stands, wheels chocked, transmission in Park/Neutral with parking brake on), have an assistant get in the driver's seat.
- Position yourself near the flex joint (but clear of any moving parts like belts or fans).
- Have your assistant slowly shift between Reverse and Drive (for automatics) or lightly rev the engine while you watch and listen.
- Watch the flex joint. Does it visibly "crab walk" or contort more than it should? Does the exhaust leak sound intensify or change pitch as the engine torques over? This confirms the leak is in a location subject to movement—a key indicator for a flex joint.
Step 4: The Verification Tests
Now that you've localized the noise and visually inspected the component, it's time for definitive proof. Choose one of the following methods.
Method A: The Unlit Propane Test (Most Effective)
Warning: Propane is flammable. Perform this test in a well-ventilated area with the engine running. Do not use near open flames or sparks. This test relies on the engine sucking in the propane, which changes the idle speed.
- Connect a hose to an unlit propane torch.
- With the engine idling, carefully direct a small stream of propane at the suspected leak area on the flex joint.
- If the engine idle speed increases or becomes erratic, you have found your leak. The engine is ingesting the propane through the gap. Mark the spot.
Method B: The Soapy Water Test
Similar to finding a tire leak, this works well for larger leaks.
- Mix a solution of soapy water (dish soap works great) in a spray bottle.
- With the engine running, liberally spray the flex joint.
- Watch for bubbles forming and growing. A leak will cause the soapy water to bubble up just like a patch on an inner tube.
Method C: The Smoke Machine Test (The Gold Standard)
If you have access to a smoke machine, this is the cleanest, safest, and most precise method.
- Following the manufacturer's instructions, introduce smoke into the exhaust system. This often involves removing an oxygen sensor and using an adapter.
- Watch the flex joint. Any leak, no matter how small, will be instantly visible as a steady stream of smoke.
Method D: The Rag and Vacuum Test (Backyard Mechanic Special)
This is a great low-tech alternative to a smoke machine.
- With the engine cold, stuff a large rag tightly into the tailpipe(s). This creates a seal.
- Remove an upstream oxygen sensor (if accessible) or, on some vehicles, disconnect the exhaust at the manifold.
- Set your shop vacuum to "blow" and seal its hose against the opening (the O2 sensor bung or the disconnected pipe). Use duct tape or rags to create a seal.
- Turn the vacuum on. It will pressurize the exhaust system slightly.
- Now, spray your soapy water mixture onto the flex joint. The escaping air will create bubbles at the leak point.
Comparing Leak Symptoms: Flex Joint vs. Other Common Leaks
It's easy to misdiagnose a leak. Here’s a quick comparison to help you differentiate a flex joint leak from other common exhaust issues.
| Symptom / Location | Flex Joint Leak | Exhaust Manifold Gasket Leak | Exhaust Pipe Flange Leak |
|---|---|---|---|
| Typical Sound | Sharp, metallic ticking that may change pitch with engine torque. | Rhythmic ticking, often loudest at cold start, located high on the engine. | Deep "chuffing" or "puffing" sound, often louder under acceleration. |
| Location | Between the engine/ downpipe and the catalytic converter. | Between the cylinder head and the exhaust manifold. | At the connection points between two exhaust pipes (usually donut gaskets). |
| Effect of Engine Movement | Noise and leak often become dramatically worse when the engine is rocked. | Minimal change with engine movement. | Moderate change, as the pipes may shift. |
| Visual Evidence | Soot, frayed braid, torn mesh. | Sooting around the head surface, possible warped manifold. | Sooting at the flange joint, possible broken flange bolts. |
What to Do After Confirmation
Once you’ve positively identified the flex joint as the source of the leak, you have a few repair options. It's crucial to understand that a leaking flex joint cannot be reliably patched. Exhaust tape or putty will fail almost immediately due to the extreme heat and constant motion.
- Replace the Entire Exhaust Section: This is the most straightforward and reliable repair. Many vehicles have a "downpipe" or "intermediate pipe" that includes the catalytic converter and flex joint as one assembly. Replacing the whole section ensures a proper fit and new components throughout.
- Cut and Weld a Universal Flex Joint: If you're handy with a welder or know a good exhaust shop, you can cut out the old flex joint and weld in a new universal one. This is often more economical. Ensure the new joint is of high quality (stainless steel) and properly aligned to prevent vibration.
- Use a Mechanical Clamp-on Repair Section: Some manufacturers offer a repair section that clamps over the existing pipes. While easier for a DIYer without a welder, these can sometimes leak over time if not perfectly fitted.
Final Thoughts on Diagnosis
Confirming a flex joint leak is a systematic process of listening, looking, and testing. By using the tools and steps outlined above, you can move beyond guesswork and make a confident diagnosis. Remember that safety is paramount—never work under a vehicle supported only by a jack, and be mindful of hot exhaust components and the dangers of carbon monoxide. A properly diagnosed and repaired exhaust system means a quieter ride, better performance, and, most importantly, a safer vehicle for you and your passengers.