

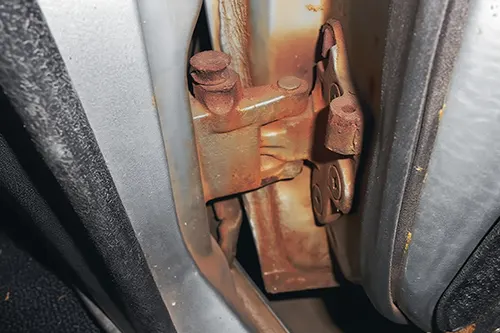
Why Your Car Door Won’t Stay Open: The Hidden Wear That Frustrates Every Drive
You swing open your car door, ready to step out, and it immediately swings back and hits your leg. Or worse, the door swings fully closed just as you’re trying to get the kids out of the back seat. This common yet deeply irritating problem is almost always caused by a worn hinge detent – a small but crucial component that provides the "hold-open" positions of your vehicle's doors. For automotive enthusiasts who appreciate how things work, understanding the detent mechanism and learning how to diagnose its wear is the first step toward a practical, cost-effective fix.
Modern car doors rely on a clever mechanical device called a door check strap or detent hinge. It combines a roller or spring-loaded plunger with specially shaped notches (detents) that create resistance at specific angles. When the detent wears down due to years of use, dirt accumulation, or lack of lubrication, the door loses its ability to stay open. The result? A door that swings freely – often into you, into the car parked next to you, or into traffic. This guide will walk you through diagnosing the exact cause and then lay out every repair option, from a simple lubricant to full hardware replacement.
How the Door Detent System Works: Engineering Behind the "Click"
Most modern vehicles use either a strap-style check or an integrated hinge detent. In the strap design, a metal arm (the check strap) attaches to the door and passes through a spring-loaded housing mounted on the door pillar. Inside the housing, a roller or plastic slider engages with notches on the strap. As you open the door, the roller clicks into each notch, giving you that tactile "stop" at half‑open and fully open positions. Over time, the notches wear down, the roller becomes flat‑spotted, or the spring loses tension. When this happens, the roller can no longer hold the notch, and the door becomes floppy.
In integrated hinge designs (common on many European and older domestic vehicles), the detent function is built directly into the upper or lower hinge. A cam with detent indentations works against a spring‑loaded pin. Wear here is less obvious but produces the same symptom: the door won't stay put. Recognizing which system your car uses is the first diagnostic step.
Diagnosing the Problem: Is It the Detent or Something Else?
Before tearing into the door, you need to confirm that the detent is indeed the culprit. Here’s a simple step‑by‑step diagnosis routine:
- The "Swing Test": Open the door about halfway and let go. A healthy detent will hold the door steady. A worn detent will allow the door to swing either fully open or fully closed with little resistance.
- Listen for Clues: Open the door slowly while listening near the hinge area. A healthy detent produces a distinct, crisp "click" at each position. A worn detent may produce a dull thud, grinding sound, or no click at all.
- Visual Inspection: Open the door to its maximum and examine the check strap (usually located between the hinges). Look for flat spots, grooves, or missing plastic on the strap. Also inspect the housing for cracks or leaking grease.
- Check for Door Sag: If the door drops slightly when opened and doesn’t align with the latch, you may have worn hinge pins in addition to detent wear. Lift the door from the bottom edge – any vertical play indicates hinge pin wear, which must be fixed separately.
- Weather and Age Factors: Vehicles in snowy or coastal regions often suffer faster detent wear due to road salt and sand grinding down the roller and notches. High‑mileage cars and those with heavy doors (SUVs, vans) also see earlier failure.
Practical Repair Options: From 5‑Minute Fixes to Full Replacement
Once you’ve confirmed detent wear, you have several options. The right choice depends on your budget, mechanical skill, and how long you plan to keep the car.
1. Lubrication and Cleaning (The First Line of Defense)
In many cases, a detent that feels “sticky” or doesn’t click properly is simply dirty or dry. Dirt, old grease, and rust can prevent the roller from fully engaging the notch. Use a brake cleaner or degreaser to thoroughly clean the check strap and the inside of the housing (if accessible). Then apply a white lithium grease spray or a dry PTFE lubricant – avoid standard WD‑40 as it washes out too quickly. After lubrication, work the door open and closed 10‑15 times to work the grease into the notches. This fix works surprisingly well for mild wear and costs less than $10. Repeat every six months.
2. Adjusting or Shimming the Detent Housing
Some vehicles (especially older GM trucks and vans) have an adjustable check strap housing. Loosening the mounting bolts allows you to shift the housing slightly so the roller contacts a less‑worn part of the strap. In other designs, you can add thin washers behind the housing to increase spring pressure. This is a free or very low‑cost tweak that can add years of life to a moderately worn detent. Check your vehicle’s service forum for model‑specific shimming tricks.
3. Replacing the Check Strap Only
If the detent housing is integrated into the door pillar but the strap is removable, you can often buy a new check strap for $15‑$40. Replacement usually involves removing the door panel (to access the inner attachment bolt), unbolting the old strap, and sliding in the new one. This is a moderate DIY job – allow 1‑2 hours. Many Japanese and Korean cars use this design, and new straps often come with fresh grease and a smoother action than original.
4. Full Door Check Assembly Replacement
For most European and modern American vehicles, the entire door check unit (strap + housing + roller) is sold as one assembly. Prices range from $25 for economy cars to $120+ for luxury brands. Replacement requires removing the door panel, unbolting the unit from both the door and the pillar, and installing the new part. This is the most reliable long‑term solution, especially if the roller is visibly flat or the housing is cracked. Some high‑end vehicles (BMW, Mercedes) use left/right‑specific checks – order the correct part by VIN.
5. Hinge Replacement (Worst Case)
If your car uses an integrated hinge detent (older Ford, Chrysler, or many trucks) and the detent is machined into the hinge itself, you have no choice but to replace the entire hinge. This is a major job: you’ll need to support the door, drill out rivets or remove hinge bolts, and realign the door after installation. Because of the complexity (and risk of damaging paint or glass), most owners leave this to a body shop. Expect $200‑$400 per door for professional hinge replacement with detent function.
Which Repair Is Right for Your Skill Level and Budget?
| Repair Method | Difficulty | Cost (USD) | Time | Best For |
|---|---|---|---|---|
| Clean & Lubricate | Beginner | $5‑$15 | 10 minutes | Mild wear, dirty detent |
| Shim/Adjust Housing | Intermediate | $0‑$10 | 30 minutes | Moderate wear, adjustable design |
| Replace Check Strap Only | Moderate | $15‑$40 | 1‑2 hours | Strap worn, housing intact |
| Replace Full Check Assembly | Moderate to Advanced | $25‑$120 | 1‑3 hours | Roller or housing failure |
| Replace Whole Hinge | Expert (or shop) | $200‑$400+ | 3‑5 hours | Integrated hinge detent worn out |
Step‑by‑Step: How to Replace a Typical Door Check Assembly (DIY)
If you’ve decided to replace the full check assembly – the most common effective repair – here’s a general procedure. Always consult your vehicle’s service manual for torque specs and special steps.
- Gather tools: Trim removal tools, socket set (usually 10mm, 12mm, or T40 Torx), flathead screwdriver, new check assembly, and white lithium grease.
- Remove the door panel: Pry off any covers, remove screws behind handles and armrests, then unclip the panel from the bottom using a trim tool. Disconnect any wiring (power windows, locks).
- Peel back the moisture barrier (carefully – you’ll need to re‑seal it). Locate the check strap mounting bolt inside the door cavity. It’s usually a large Torx or hex bolt.
- Open the door fully and unbolt the strap from the door pillar (the part visible from outside).
- Remove the inner bolt and slide the old check strap out through the door gap.
- Compare old and new – ensure lengths and notch positions match.
- Apply grease to the new strap’s notches and to the roller housing.
- Install the new assembly by reversing removal: insert the strap through the door slot, attach the inner bolt (use threadlocker), then bolt the housing to the pillar. Torque to spec (typically 18‑25 ft‑lbs).
- Test the door – it should click into two or three defined positions with solid hold.
- Reattach the moisture barrier, door panel, and wiring – check that all clips are secure.
Pro tip: While the door panel is off, inspect the window regulator and speaker connections. It’s a good time to lubricate window tracks and tighten any loose fasteners.
When to Call a Professional
Not everyone wants to spend a Saturday wrestling with door panels and rusted bolts. Here are clear signs that it’s time to visit a trusted mechanic or body shop:
- The door has significant vertical play (sagging) – this indicates worn hinge pins that require a hinge rebuild kit or welding.
- The check strap is riveted to the door frame, requiring drilling and special rivet tools.
- You have a luxury or classic car with expensive, hard‑to‑find detent parts.
- You’ve already tried lubrication and a new check assembly, but the door still won’t stay open – there may be internal door structure damage.
Professional repair typically costs $150‑$300 per door for check assembly replacement, including labor. Hinge replacement can run $400‑$800. Always ask for a written estimate and ask if they use OEM or high‑quality aftermarket parts.
Preventing Future Detent Wear: Maintenance That Pays Off
Once you’ve fixed the door, you want it to last. Follow these simple habits:
- Lubricate every oil change: Spray white lithium grease into the check strap area at least twice a year. In dusty or salty environments, do it every three months.
- Don’t let the door swing freely: Encourage passengers (especially kids) to guide the door rather than letting it slam open or closed. The shock load accelerates detent wear.
- Clean the check strap with a rag whenever you wash the car – remove grit before it grinds the notches.
- If you park on a steep incline, be aware that gravity adds extra force to the detent. Use a door stop or park with the door facing uphill.
Conclusion: A Small Fix That Restores Daily Driving Enjoyment
A door that won’t stay open is more than an annoyance – it’s a safety hazard and a sign of neglected maintenance. Fortunately, the diagnosis is straightforward, and repair options range from a five‑minute lube job to a satisfying afternoon DIY project. By understanding the hinge detent mechanism, you’ve already outperformed 90% of car owners who simply tolerate the problem. Whether you choose a quick clean, a new check strap, or a full assembly replacement, fixing this issue will make every entrance and exit feel solid, secure, and surprisingly satisfying.
Remember to always support the door with a jack or a helper when removing hinges, and never work on a door that could fall and cause injury. With the right approach, your car doors will once again hold their position – and you’ll wonder why you waited so long to fix it.