

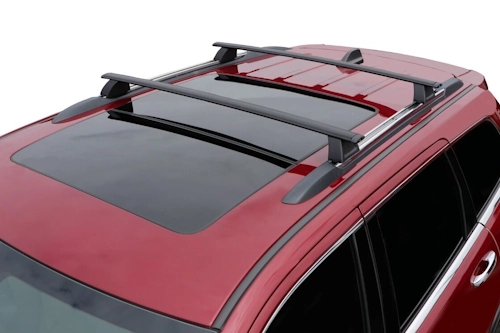
Roof racks are one of the most practical accessories for expanding your car’s cargo capacity. Whether you need to carry bicycles, skis, a roof box, or oversized gear, choosing the right system is crucial. This article explains the different types of roof racks, how to calculate load capacity, and how to install them safely on your car.
Main Types of Roof Racks
Different cars come with different roof structures, and roof rack systems are designed accordingly. Here are the most common types:
- Raised Rail Racks: Found on many SUVs and crossovers. They allow easy attachment of crossbars that clamp directly onto the rails.
- Flush Rail Racks: Sleeker rails that sit flush against the roof. They require specialized feet and adaptors for secure mounting.
- Gutter-Mounted Racks: Common on older vehicles or vans, where the rack clamps into the rain gutter channels.
- Fixed Point Racks: Some cars come with factory-installed fixed mounting points hidden under plastic covers. They offer a clean look and strong support.
- Door Clamp Racks: For cars without rails or gutters, these racks use hooks that clamp into the door frame. They are versatile but require precise installation.
How to Calculate Load Capacity
Understanding how much weight your roof rack can safely carry is essential. Load capacity depends on three factors:
- Vehicle Roof Limit: Check your car’s owner’s manual. Most vehicles specify a maximum dynamic roof load (e.g., 75 kg).
- Roof Rack Capacity: Each rack system has its own limit. Always respect the lower value between the vehicle and the rack.
- Load Weight: Subtract the weight of the rack itself and accessories from the total limit to find how much cargo you can carry.
For example, if your car’s roof limit is 75 kg and the rack system weighs 8 kg, you can carry 67 kg of additional cargo. Always distribute weight evenly and secure it properly.
Step-by-Step Installation Guide
Installing a roof rack may sound complicated, but most modern systems are designed for DIY setup. Here is a general guide:
Step 1: Check Compatibility
Ensure the rack system matches your vehicle’s roof type and that you have the correct kit for your model.
Step 2: Prepare Tools and Parts
Usually, you will need the mounting feet, crossbars, clamps, bolts, and a torque wrench. Keep everything organized before you start.
Step 3: Position the Mounting Feet
For fixed points, open the covers and align the mounting feet. For clamp-style racks, hook them into the door frame carefully. Ensure symmetry between both sides.
Step 4: Attach Crossbars
Place the crossbars onto the mounting feet. Adjust spacing according to your load (e.g., roof box or bike rack mounting instructions). Both bars must be parallel and evenly spaced.
Step 5: Tighten and Secure
Using the torque wrench, tighten bolts to the manufacturer’s recommended force. Do not overtighten, as it can damage the roof rails or clamps. Once secure, check stability by shaking the rack gently.
Tips for Safe Use
- Check all bolts and clamps before each trip.
- Do not exceed speed limits recommended for loaded roof racks (usually 120 km/h).
- Remove the rack when not in use to save fuel and reduce wind noise.
- Distribute cargo weight evenly and avoid top-heavy loads.
Conclusion
Choosing and installing a roof rack is a straightforward process if you understand the different types and respect weight limits. With the right setup, you can safely transport extra gear and enjoy greater flexibility for travel and outdoor adventures.
Practical section
What are the main types of roof racks?
The main types include raised rail, flush rail, gutter-mounted, fixed point, and door clamp racks.
How do I calculate load capacity?
Check your car’s manual, the rack’s own rating, and subtract the rack’s weight from the vehicle’s limit. Always stick to the lowest value.
h3>Can I install a roof rack myself?Yes, most systems are designed for DIY installation using basic tools like a torque wrench. Always follow the manufacturer’s guide.