

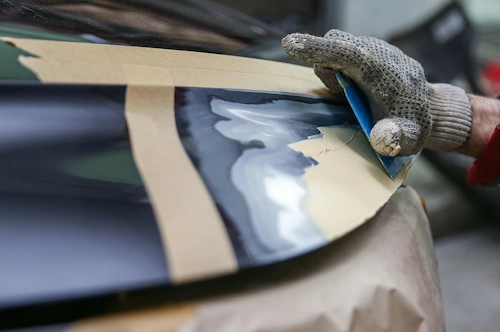
Automotive body filler remains one of the most valuable skills in automotive repair, enabling enthusiasts and professionals to restore vehicle surfaces to like-new condition. When applied correctly, this versatile material can seamlessly repair dents, scratches, and minor rust damage, saving thousands in body shop expenses. This comprehensive guide reveals professional techniques and insider secrets for achieving perfect results every time.
Understanding Automotive Body Filler Types
Not all body fillers are created equal. Selecting the appropriate product for your specific repair ensures better adhesion, easier sanding, and longer-lasting results. Modern fillers consist of polyester resin combined with a hardener (typically methyl ethyl ketone peroxide), which catalyzes the curing process through an exothermic chemical reaction.
| Filler Type | Best For | Working Time | Key Characteristics |
|---|---|---|---|
| Standard Grade | Minor dents and scratches | 20-25 minutes | Lightweight, easy to spread, may lack stain resistance |
| Medium Grade | Small holes or cracks | 15-20 minutes | Fiberglass-reinforced, better adhesion, moderate stain resistance |
| Premium Grade | Large area repairs, high-quality finishes | 25-30 minutes | Highest stain resistance, minimal shrinkage, easiest sanding |
| Specialized Formulas | Unique applications | Varies | Includes flexible plastic fillers, wheel repair compounds, and primer-filler hybrids |
For structural repairs involving holes or cracks, fiberglass-filled body filler provides additional strength and creates a permanent, waterproof seal. For final surface refinement, glaze fillers (also called knifing putty) excel at filling microscopic imperfections and sandpaper scratches before priming.
Pro Tip: Temperature significantly affects working time. To extend cure time, work in cooler environments (below 70°F/21°C). To accelerate curing, use heat lamps—but avoid excessive heat that can cause premature curing and uneven results.
Essential Tools for Professional Results
Gathering the proper tools before beginning your repair ensures a smooth process and superior finish. The right implements make the difference between an amateur-looking repair and an invisible one:
- Plastic spreaders in various sizes and flexibilities
- 1-meter steel rule (aluminum rules may kink and create uneven surfaces)
- Non-porous mixing surface (glass, metal, or rigid plastic)
- Mixing sticks (never use the same stick to remove filler from the container)
- Coarse and fine grit sandpapers (80-400 grit)
- Sanding block
- Degreaser and cleaner
- Rust neutralizer
- Body filler applicator
- Dry Guide Coat powder or spray
Surface Preparation: The Foundation of Perfect Filler Application
Proper surface preparation represents 80% of a successful repair. Skipping or rushing this crucial step inevitably leads to adhesion failure, bubbling, or visible repair lines weeks or months later. Follow these critical preparation steps:
1. Thorough Cleaning
Begin with washing the repair area using automotive bodywork shampoo and warm water. For stubborn traffic film, adhesive residue, or wax, use a specialized automotive cleaner. Completely remove all contaminants that might prevent proper filler adhesion.
2. Rust Removal and Treatment
Body filler will not properly adhere to rusted surfaces and will eventually fail. Remove all rust using mechanical methods (sanding, grinding, media blasting) or chemical rust converters. After removal, apply a quality rust neutralizer to any difficult-to-treat areas to prevent recurrence.
3. Creating Proper Adhesion
Sand the entire repair area with coarse grit sandpaper (80-120 grit) to create a "key" for the filler to grip. Feather edges of existing paint 2-3 inches beyond the damage perimeter. This gradual transition prevents visible edges after painting.
4. Final Degreasing
Wipe the entire prepared area with a dedicated automotive degreaser using a clean, lint-free cloth. This removes invisible oils, silicone, and fingerprints that could compromise adhesion.
Critical Safety Note: Never apply body filler near full gas tanks. Auto filler is flammable and only becomes gas-resistant after complete curing. Similarly, avoid application near ignition sources or in poorly ventilated areas.
The Art of Mixing Body Filler
Proper mixing ensures complete curing and maximizes the filler's structural integrity. Incorrect ratios or incomplete mixing result in sticky, uncured spots or brittle, prone-to-cracking repairs.
Always mix on a non-porous surface. While cardboard might seem convenient, it absorbs chemicals from the filler and introduces air bubbles that create pinholes in the finished surface. Use a clean piece of glass, metal, or rigid plastic instead.
Follow the manufacturer's recommended ratio precisely—typically a specific length of hardener to a golf-ball-sized amount of filler. Adding too much hardener accelerates curing but creates excessive exothermic heat, leading to pinholes and reduced strength. Insufficient hardener results in incomplete curing and a soft, gummy fill.
Mix thoroughly until no streaks of hardener remain, but avoid whipping excessive air into the mixture. Mix smaller batches for better control and less waste, as polyester fillers have limited working times once catalyzed.
Professional Application Techniques
The Steel Rule Method
Professionals often employ a steel rule to achieve perfectly contoured surfaces with minimal sanding. Position the rule across the damaged area to visualize the depression—the gap between the rule and panel indicates where filler needs application.
After applying filler with a plastic spreader, use the steel rule to remove excess material. Pull the rule tightly against undamaged areas surrounding the repair, dragging it across the fresh filler. This technique leaves filler only in the low areas, dramatically reducing sanding time and material waste.
Layering Strategy
Apply multiple thin layers rather than one thick blob. Thick applications trap heat from the exothermic curing reaction, potentially causing cracking, excessive shrinkage, or pinholes. Allow each layer to fully cure before applying the next, sanding lightly between coats with 80-grit paper to improve inter-coat adhesion.
Extend the filler slightly beyond the repair area to facilitate feathering during sanding, but avoid excessive overapplication that creates unnecessary sanding work.
Pro Tip: Mark repair boundaries with a spirit-based marker rather than pencil. Graphite in pencils can prevent proper filler adhesion, while spirit markers won't interfere with bonding.
Sanding and Finishing Like a Pro
Proper sanding transforms lumpy filler into a seamless surface ready for priming. Begin sanding only after the filler has fully cured—typically 20-30 minutes depending on type and thickness. Test by pressing your thumbnail into an inconspicuous area; properly cured filler will not yield under pressure.
Start with coarse grit (80-120) sandpaper to remove excess material and level the surface. Use a sanding block to maintain flat planes and avoid creating low spots. Check progress frequently with your steel rule and a light source behind it—any light visible between the rule and surface indicates low areas needing more filler or high spots requiring more sanding.
After achieving the basic contour, switch to finer grits (180-240) to remove scratches from coarse sanding. For final finishing, use 400-grit paper to feather the edges seamlessly into surrounding paint.
The Dry Guide Coat Technique
Apply Dry Guide Coat (a special black powder) with a sponge over the sanded surface. This material accumulates in microscopic low spots and pinholes, revealing imperfections invisible to the naked eye. Sand lightly until the guide coat disappears, indicating a perfectly level surface.
Common Body Filler Mistakes to Avoid
Even experienced enthusiasts can make these errors. Awareness prevents costly rework:
Applying over rust: Filler over rust guarantees failure. The corrosion continues underneath, eventually bubbling through the repair. Always remove all rust and treat with neutralizer before filling.
Incomplete mixing: Streaks of unmixed hardener create soft spots that won't sand properly and may weep resin.
Ignoring pinholes in welded repairs: Before filling welded areas, inspect for pinholes by placing a bright light behind the weld and looking for light penetration. Seal any pinholes with additional welding or epoxy sealant to prevent water infiltration that bubbles through filler later.
Sanding with clogged paper: Frequently clean or replace sandpaper. Clogged paper polishes rather than abrades, extending working time and potentially creating heat that damages the repair.
Final Preparation for Priming and Painting
After achieving a perfect surface, apply a high-build primer filler to fill microscopic scratches and pinholes. This specialized primer sands easily and reveals any remaining imperfections through "witness marks" when sanded.
If you performed wet sanding, allow the filler to dry thoroughly for at least 24 hours before priming. Filler absorbs water during wet sanding, which can trap moisture beneath subsequent layers and cause bubbling when heated.
Inspect the repair from multiple angles under bright light before priming. The surface should feel perfectly smooth to the touch with no visible transitions between filler and original metal. When satisfied, proceed with your preferred priming and painting process.
Mastering automotive body filler application takes practice, but the savings and satisfaction of performing professional-quality repairs yourself make the effort worthwhile. With these techniques and attention to detail, you can restore damaged auto bodies to showroom condition.